DIY Wine Bottle and Glasses Holder
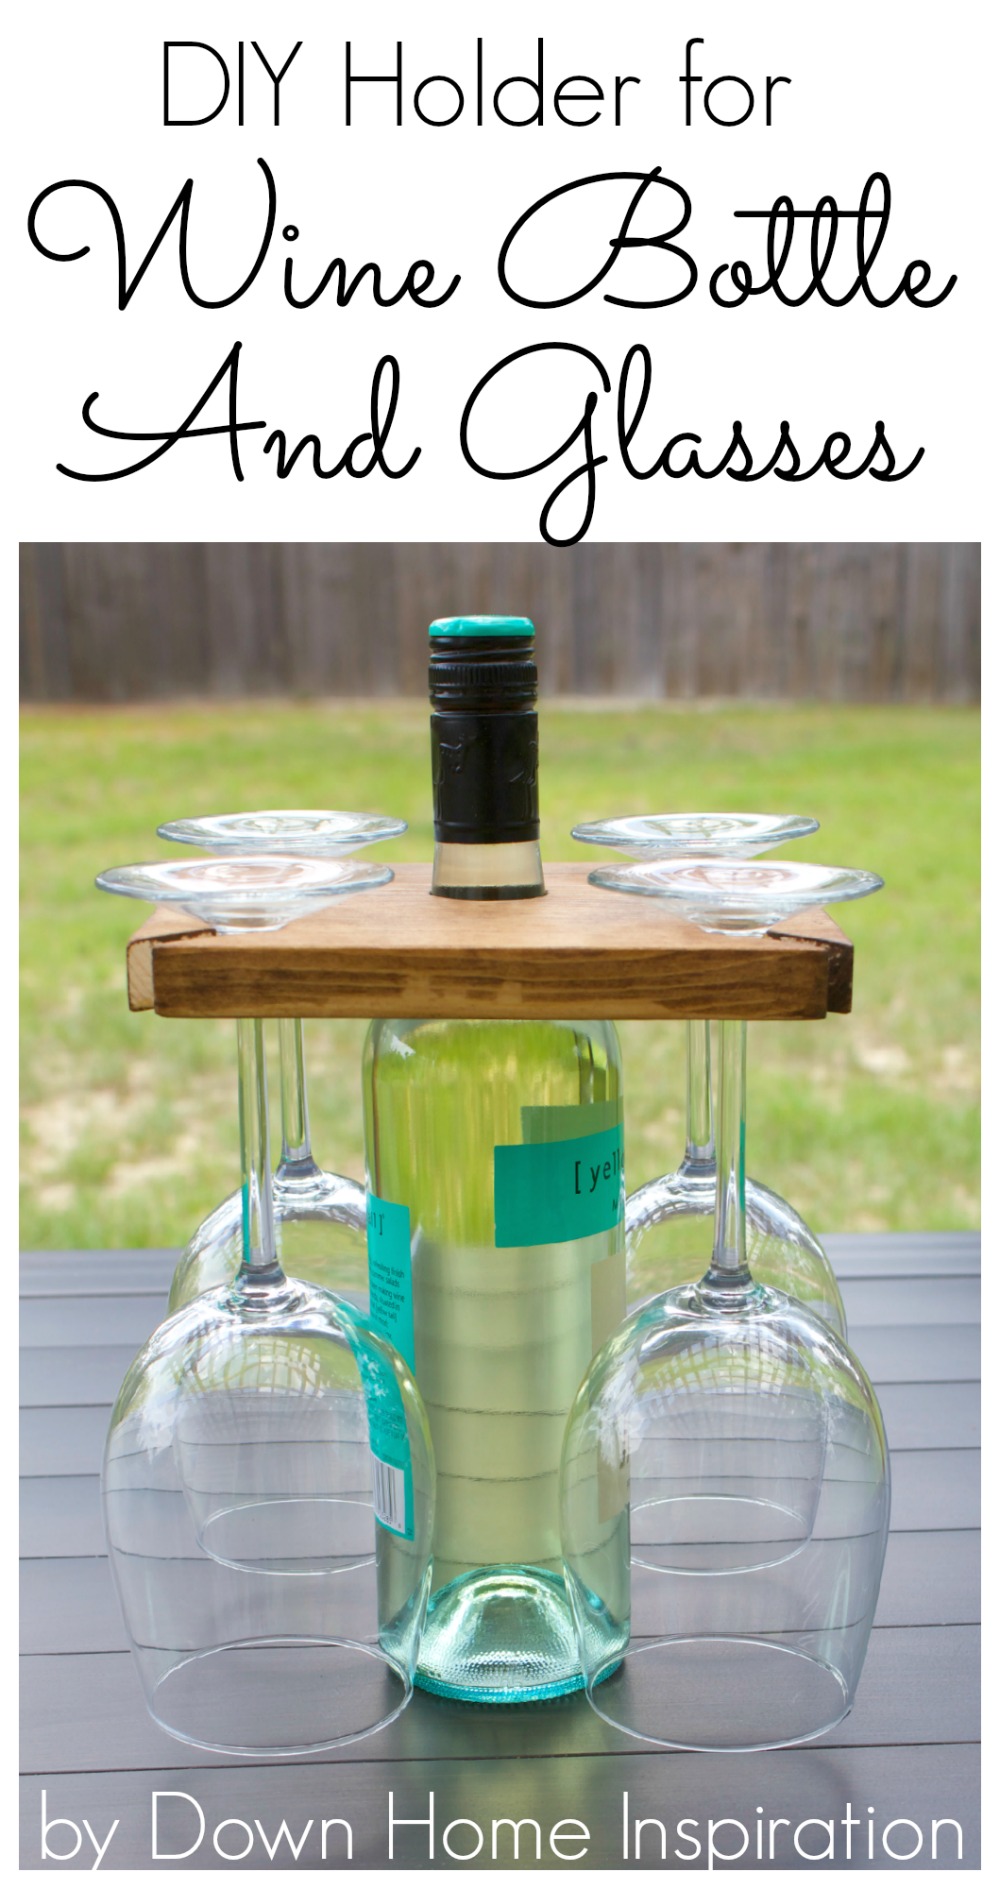
You guys aren’t starting to think that I’m a lush are you? I mean after the Orange Crush post, the Moscato Strawberry Lemonade and the discussion about leftover bottles to decorate with in the Wine Bottle Bird Feeder post I could see how you might start to get suspicious. I’m definitely not…I promise! But I am lazy, and that’s where this super fun DIY wine bottle and glasses holder project comes in to play. Why fill up your hands and arms trying to carry your wine when you can just grab the neck of the bottle and have it all right there at your fingertips. Literally, at your fingertips. This super fun DIY wine bottle and glasses holder is a one stop shop for your carrying needs. Going on a picnic? Grab away. Headed to your patio? Why make multiple trips, you’ve got it all in one hand, leaving you free to grab the chesse tray too! The good news is that this is relatively easy and also inexpensive. If you have a decently stocked garage this can be whipped up in a snap. Here’s what you’ll need, and what could be helpful: 1 x 8 board (you’ll only need 7 1/2 inches, so the smallest you can find at your store) saw (I used a miter saw, but a hand or jig saw could work if you have a steady hand) drill 5/8″ drill bit 1 1/2″ drill bit scroll saw or jig saw Optional: drill press 1 1/4″ drill bit Dremel tool Okay, so not too bad, right? Let’s get started chatting about how to make it. Start by cutting your board to be square 7 1/2″ by 7 1/2.” You’ll want to take the opportunity to measure and mark where each glass and the bottle will sit. This could vary slightly if you have a favorite set of glasses that you want to use. Here is what mine looked like:
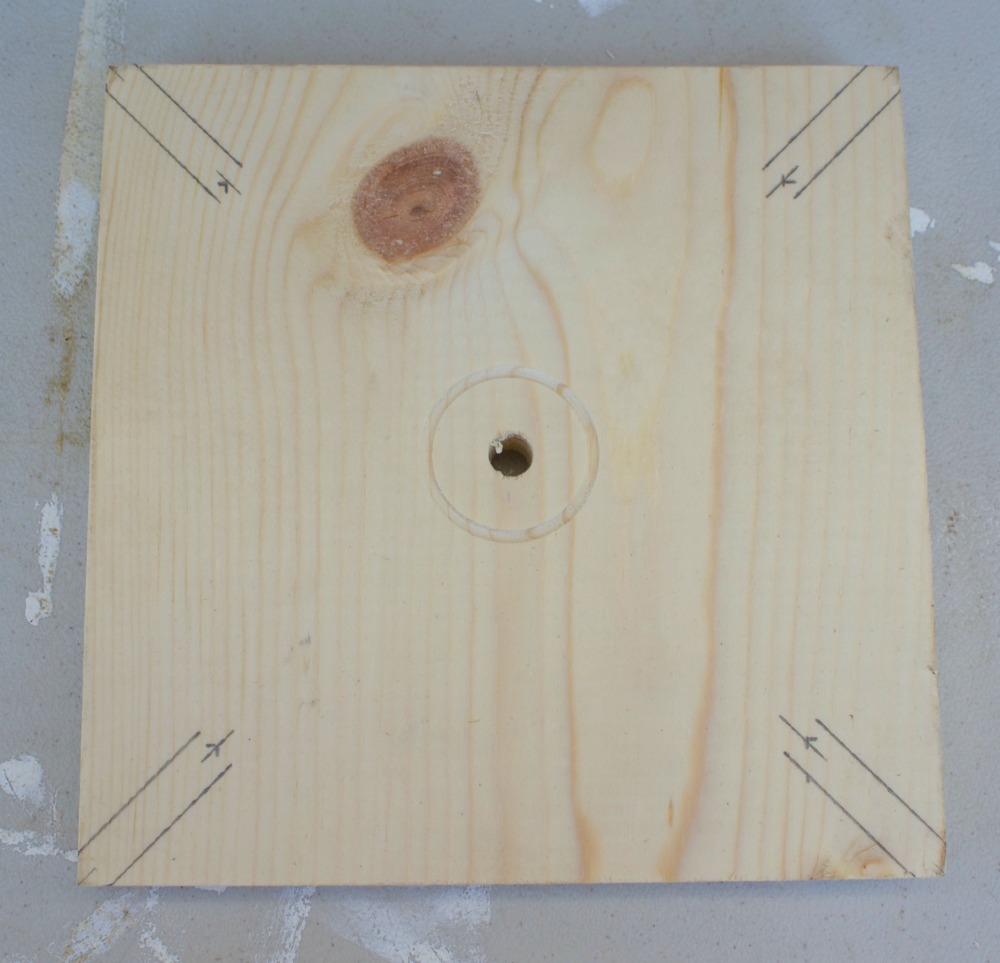
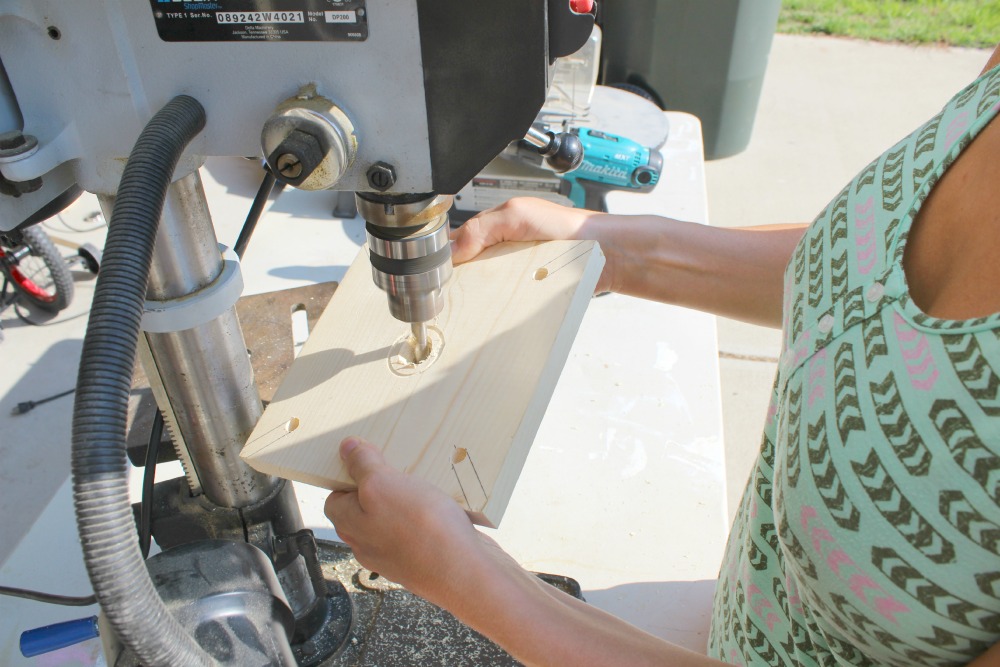
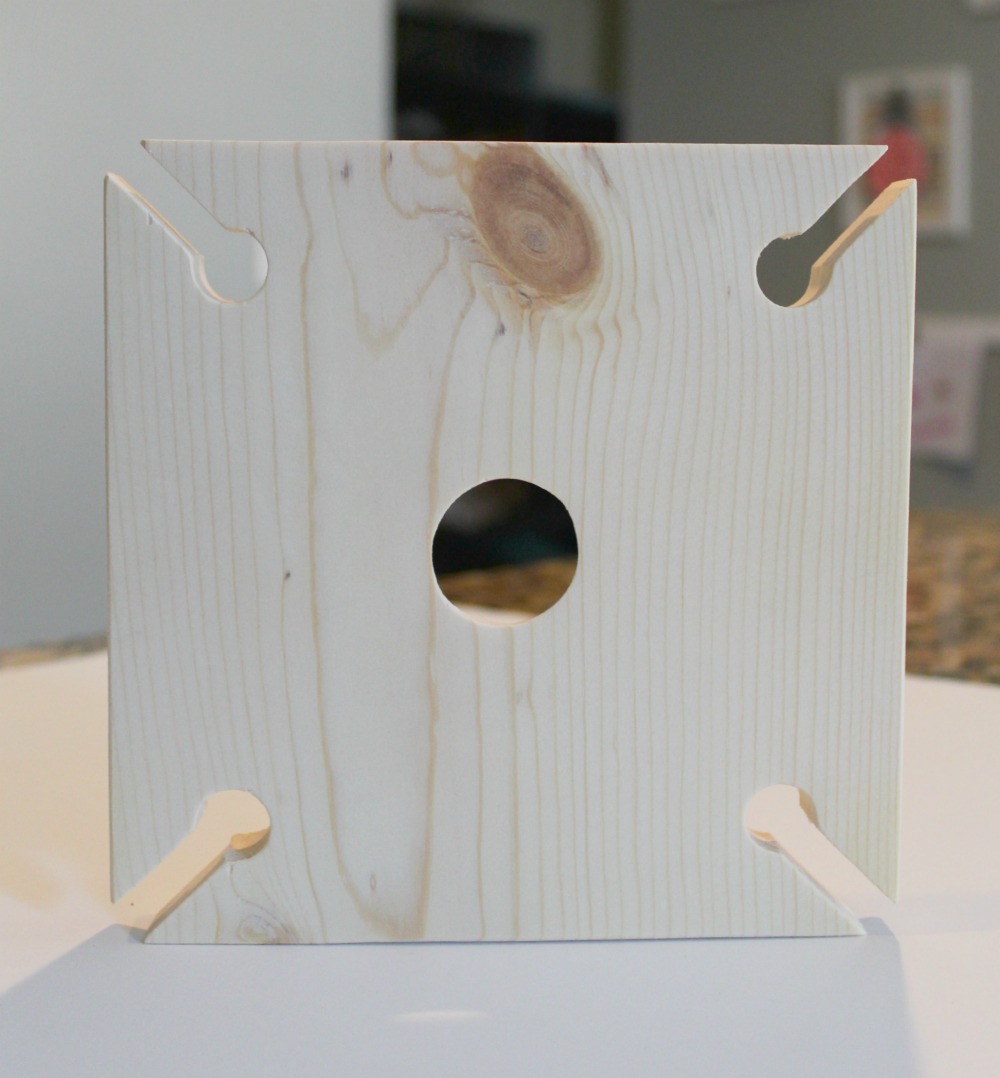
The next step can be done the easy way or the hard way depending on your own needs. The easy way would be to use a 1 1/2″ drill bit and drill a whole straight through the center of the board to become the opening for the bottle. This is totally fine, there just might be a bit more wobbling because the bottle isn’t in there as snugly as it could be. Because I hate to make things simple on myself, I chose to use a 1 1/2″ circle to mark the bottom and then drilled through with a 1 1/4″ drill bit. I then tapered my hole so that it went from 1 1/4″ on top to 1 1/2″ on bottom. That just fit the neck of the bottle better as it becomes wider the further down the neck you go. What can I say, I’m a glutton for punishment. Here I am working on tapering, but let’s all pretend that we don’t see that I am wearing my pajamas.
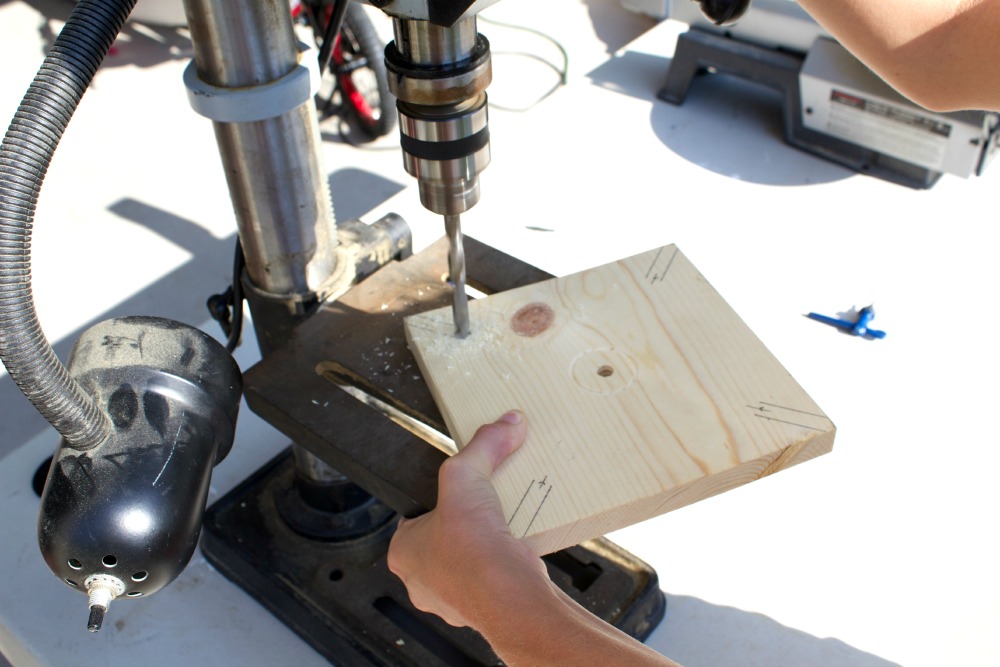
Moving right along here… Next is making the holes for the glasses to rest in. Because we don’t want the glasses to be able to slide out on their own, we’re making a 5/8″ hole for the glasses and a 3/8″ channel. So using your markings and a 5/8″ drill bit, make a hole on each corner for the glasses.
Now it’s time to make the channels. You can do this with either a jig saw or a scroll saw to achieve the nice straight lines. Cut directly from the 5/8″ hole you just made to the corner of the board. Remember that this channel should be 3/8″ wide. Repeat on all sides. Now you should have something that looks like this:
And now comes the fun part of sanding the living daylights out of it. I used a Dremel tool to sand in the holes and channels, but you would be able to get in there with just a piece of sandpaper. It will just take a little more patience. Something that I lack. I’m working on that. Choose a stain or paint and decorate as you like. I kept it simple, but I am thinking about burning a monogram onto the top. What do you think? It would also be fun to paint a monogram. Ooh, wouldn’t this be great as a wedding gift? I’m getting a bit carried away here.
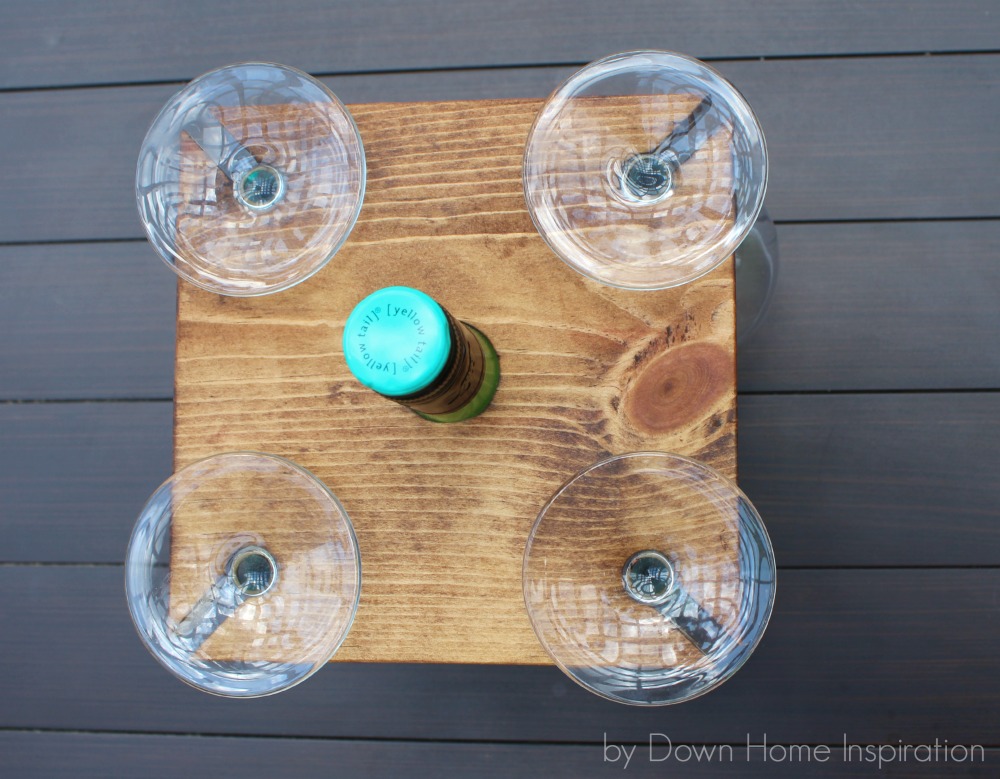
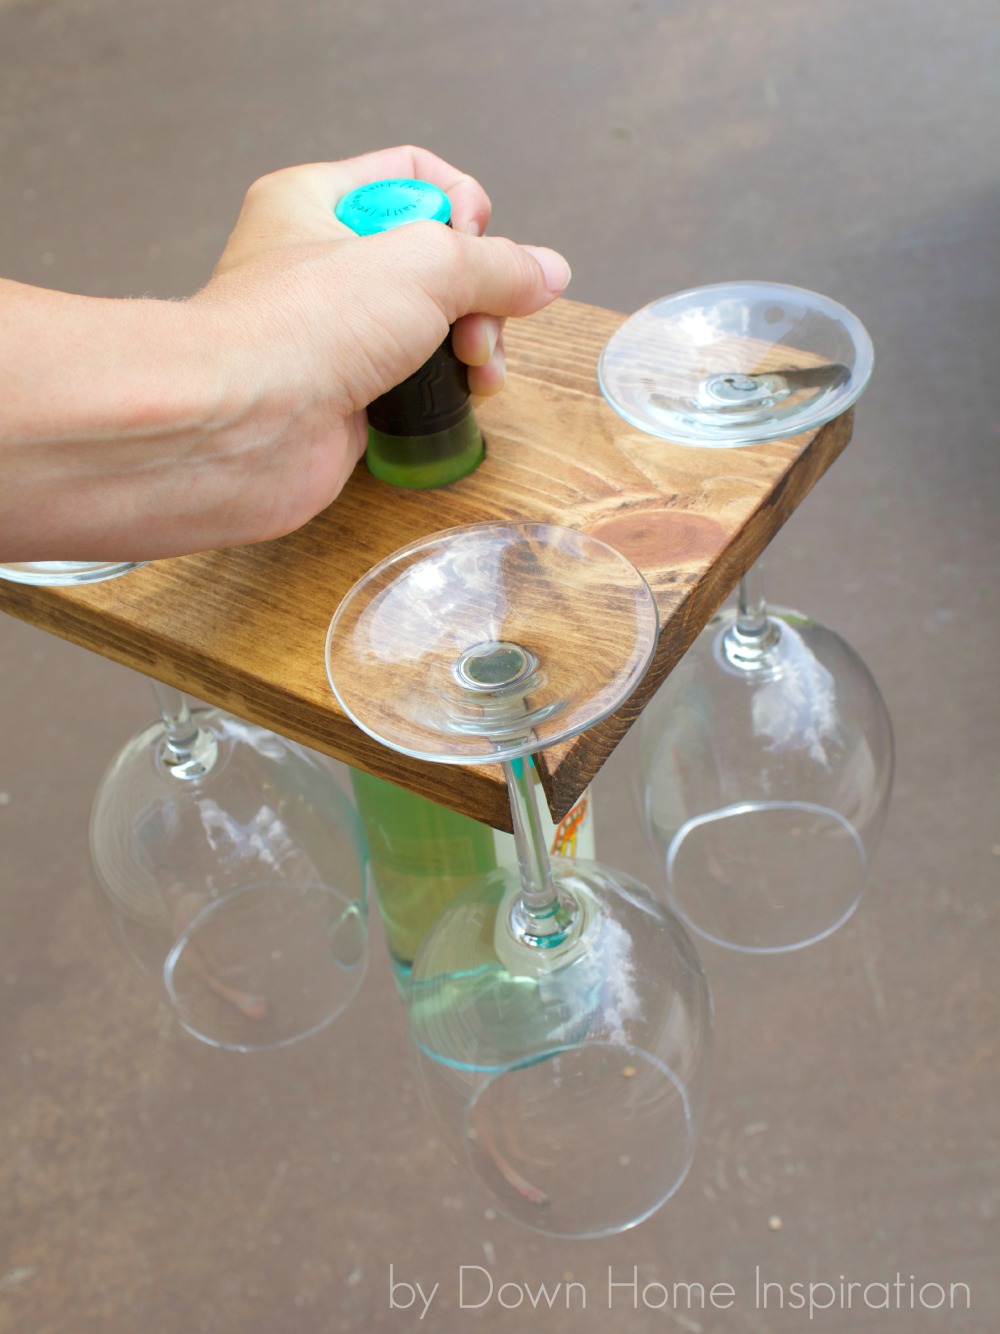
And now it is totally simple (and I can be super lazy) to carry my glasses and bottle with me. This is a shot that I took of my own self holding it:
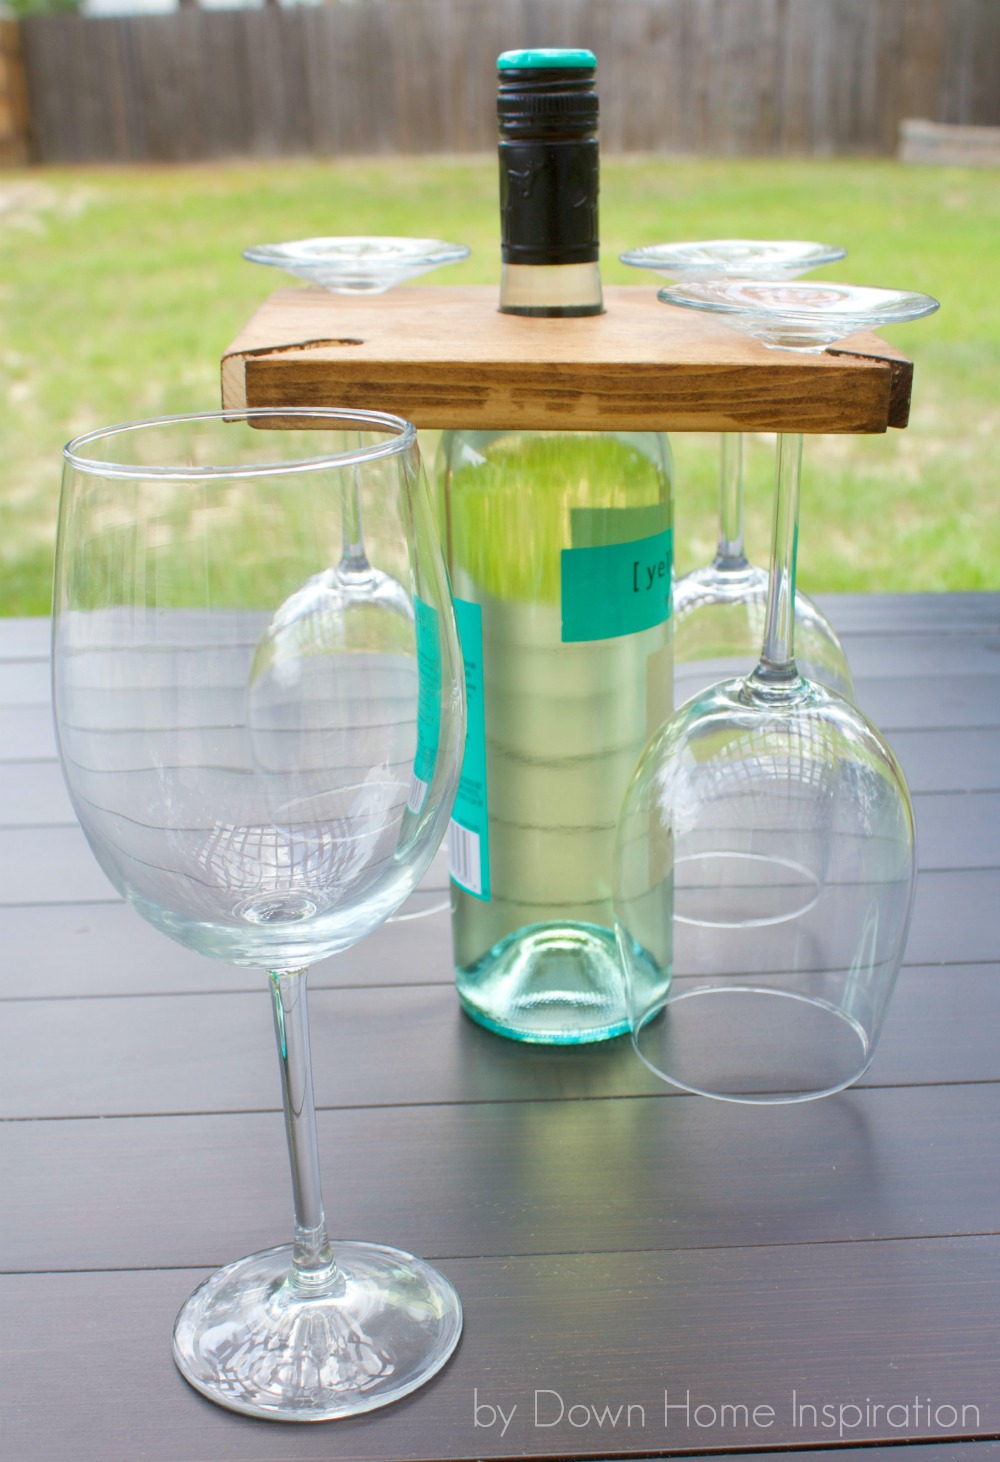
And one more money shot… Tell me, could you see yourself using this carrier? Would it make your life simpler? I’d love to hear your thoughts on it!


That is so stinkin cute!! I love it as is, but I think it would be fabulous monogrammed too!!
There’s nothing quite like a monogram to add a new layer of cute!
This is genius!! I need one of these for sure!
Thanks Emily!
Take this idea and get it patented before someone else steals your idea!!!
Haha, thanks Jo-Anne! It has been pretty handy, pun intended. 🙂
Oh I love this! What a great idea!
Thank you so much, Tina!
I am so impressed with your creativity!! Where in the world do you get these ideas?? Thanks for sharing!!
Oh that’s so sweet Mary! I am constantly looking around everywhere I go and trying to think of how I could create my own version or change it to work for me. I have a notebook full of random ideas that I keep in my car, believe it or not. 🙂
I wish I knew someone to make me these for gifts..I have no way to make them!
i love this idea. i was thinking of using a decorative bottle for the center just to hold the glasses.
That would be fun Natasha. Then you could just leave it out to look pretty!
How long is your channels?
I would put the 5/8″ hole next to the 3/8″ channel. It would look like an “I” with a dot on the side. This would better secure the glass for carrying the empties back.
Hi Kristen!!
Really cool post – I learnt a thing or two about wine holders!
I see you mentioned the use of a Dremel tool. I actually recently wrote a complete FAQ on using a Dremel tool.
Maybe your readers might get some use out of it
http://tooljuice.com/how-to-use-a-rotary-tool-dremel-tool-what-is-faq/
Getting ready to start Working on these now for Christmas gifts. Cross our fingers they come out of.
I did it!!!! thanks for info I really love how it came out.
Yay, that is so great Cindy!!!!
Thanks for share the article.
Thank you so much.
Nice idea. What is the length of your channels before you drilled your 5/8 hole? and how are you tapering it? After you drilled your smaller center hole, are you just sanding it from the back side to get the larger taper?? Thanks bunches!!
Debbie.
This is such a neat idea for glassware! There’s nothing worse than making so many trips to get the patio table set.
Cutting a slot on either side (like the wine glass slots) to hold a knotted rope. The rope fits under the bottle. On opposite sides drill two holes for a rope handle.
This is really a great idea. I wish I had the knack for woodworking as well as the tools and space for that. Would be a great addition to any home, and yes…it’ll be a nice wedding present – especially for wine lovers!
I don’t understand….what keeps the stems of glasses from sliding out as you carry it?
Hi Karen. The way that the channel is cut makes it harder for the glass to slide out. It is just large enough for the stem to slide through and then has the larger circle for it to sit in. It would take some effort for it to slide out.
Just made one for my mother in law. It’s not as well finished (I had a few hours to make it so it’s a bit rough around the edges as it were). Let my young kids draw all over it and I’ve got a coat of varnish on it.
She’s a wine lover so I’m hoping it will be of use for her and her friends.
Thanks so much for the inspiration, I was at a loss for what to get her this year.
Love it! Great way to personalize it for her too!