Edited to add: This post has become so incredibly popular that I have now added a FAQ post that answers the burning questions sent to me by readers. It can be found here.
Holy cow, this post has been a while in the making. Not because it took long for the project, but because I held off on posting thinking the interest in my original $10 and 10 minute DIY widow valance post would die down.
It hasn’t.
Not only has interest not died down, it increases by a massive amount every day.
You guys seem to love it. And I love that!
But there seems to be one small problem with the window valance post. People want a way to make it renter friendly, or they may not be too keen on putting a few small holes in their window frames. I get multiple emails every. single. day about it…
No worries, my dear sweet readers, I’ve got you covered!
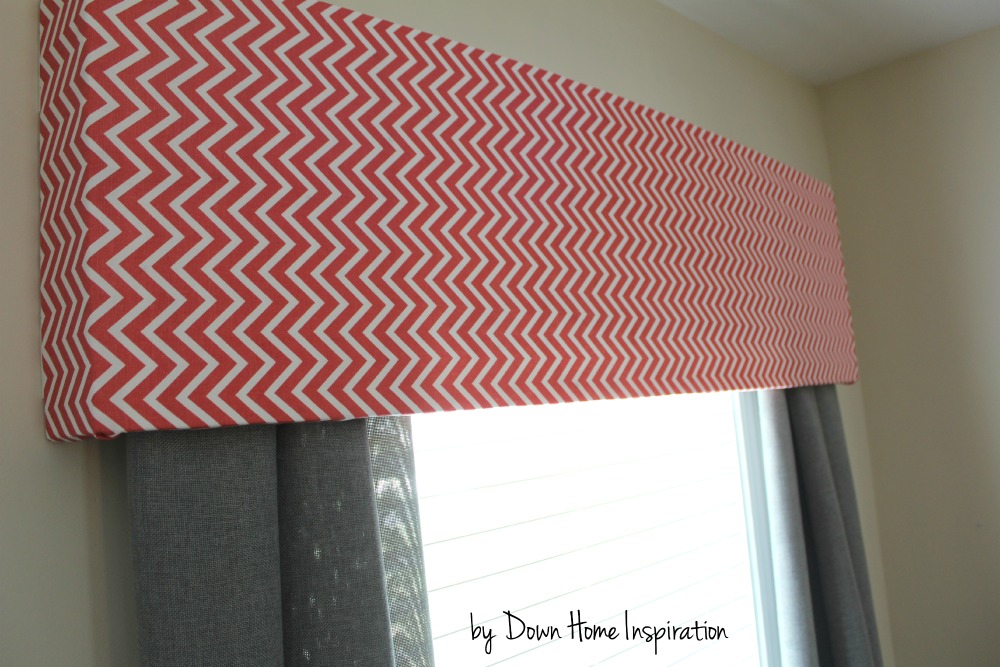
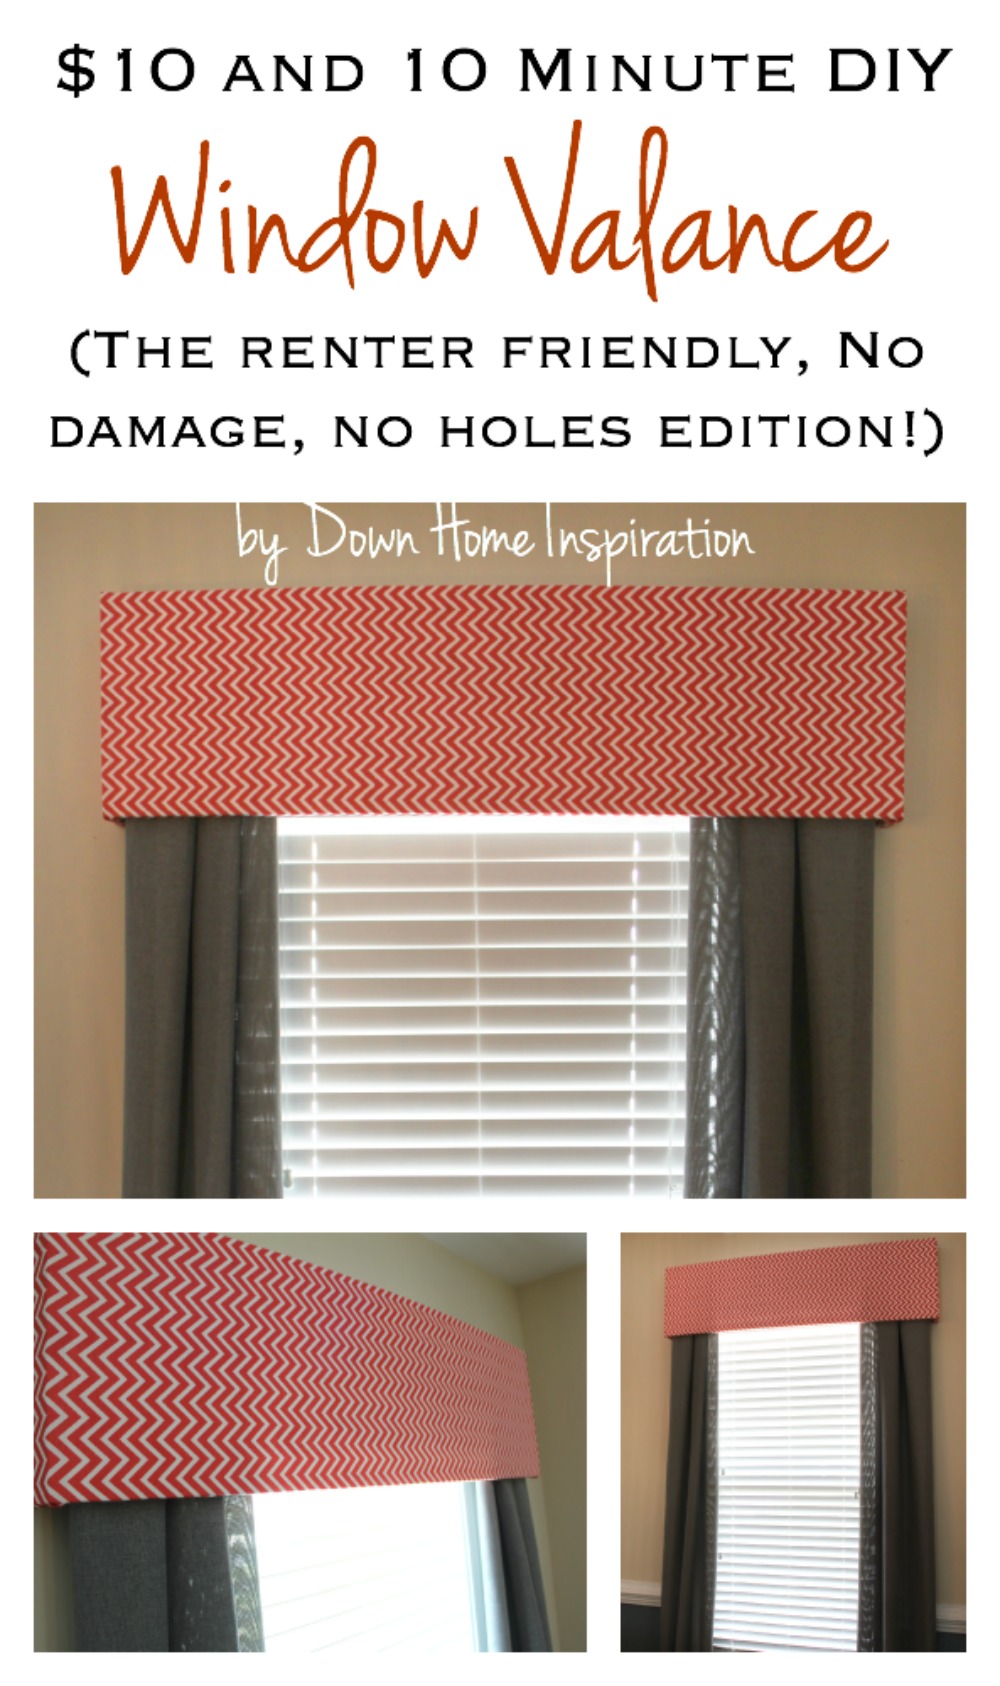 The basic directions for the DIY window valance are the same, the only thing that we are altering here is how it is being attached to the wall. So please read the directions on the original post first to complete your valance.
With the valances that I had made for my kitchen and my daughter’s room I attached the valance directly to the window casing, but as I was redecorating my craft room I realized that I wanted curtain panels and a valance. To build my valance to go around my curtain rod would be the perfect test run for my renter friendly, no hole valance plan, so I set about getting to work.
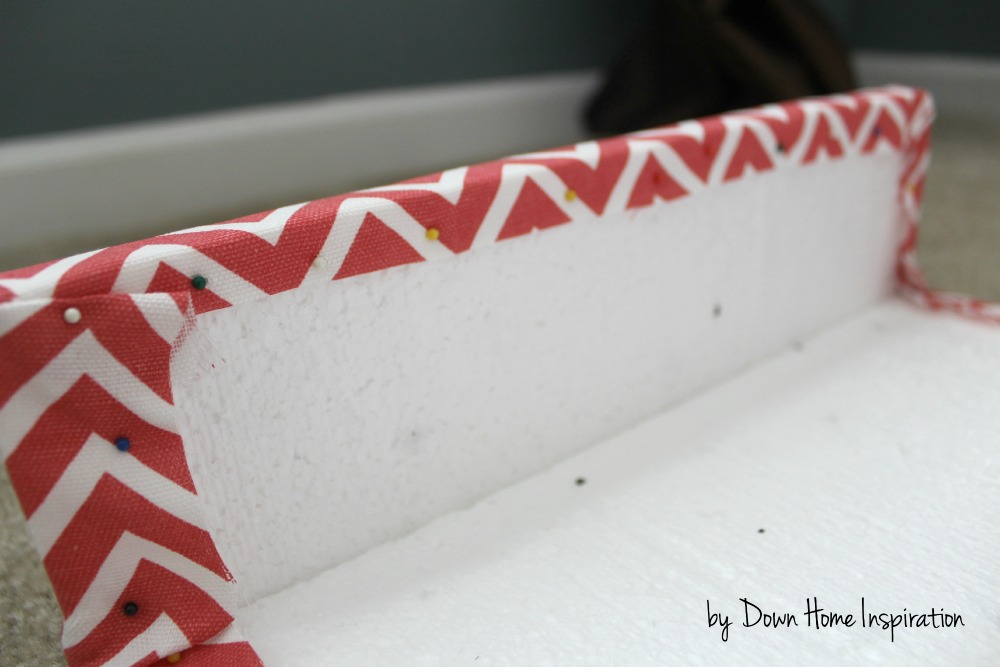
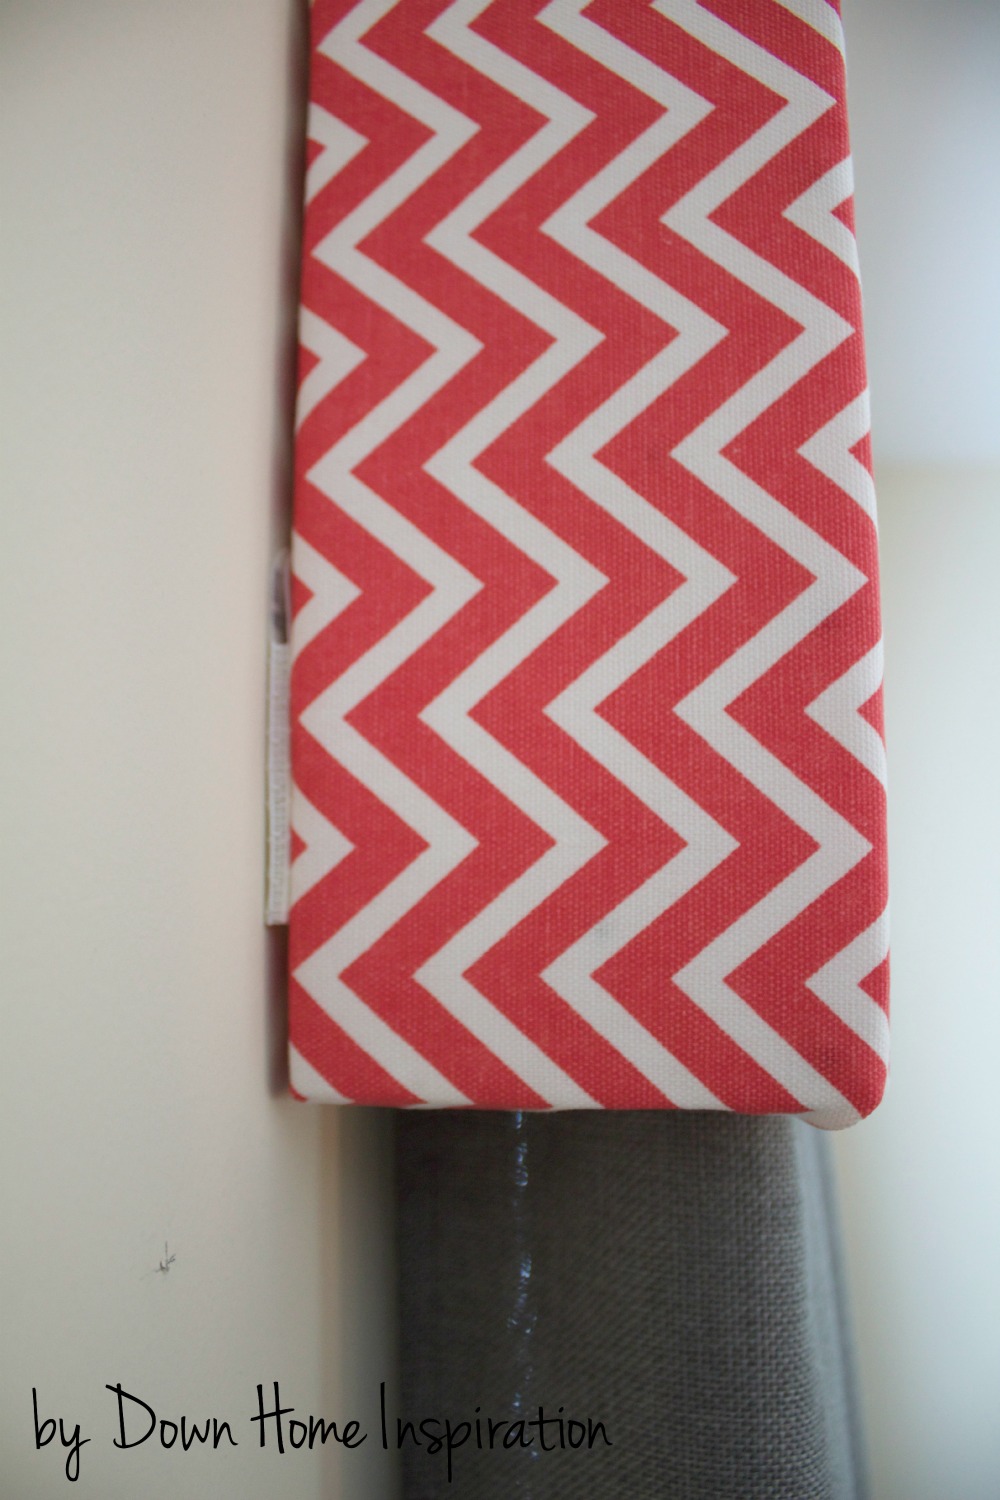
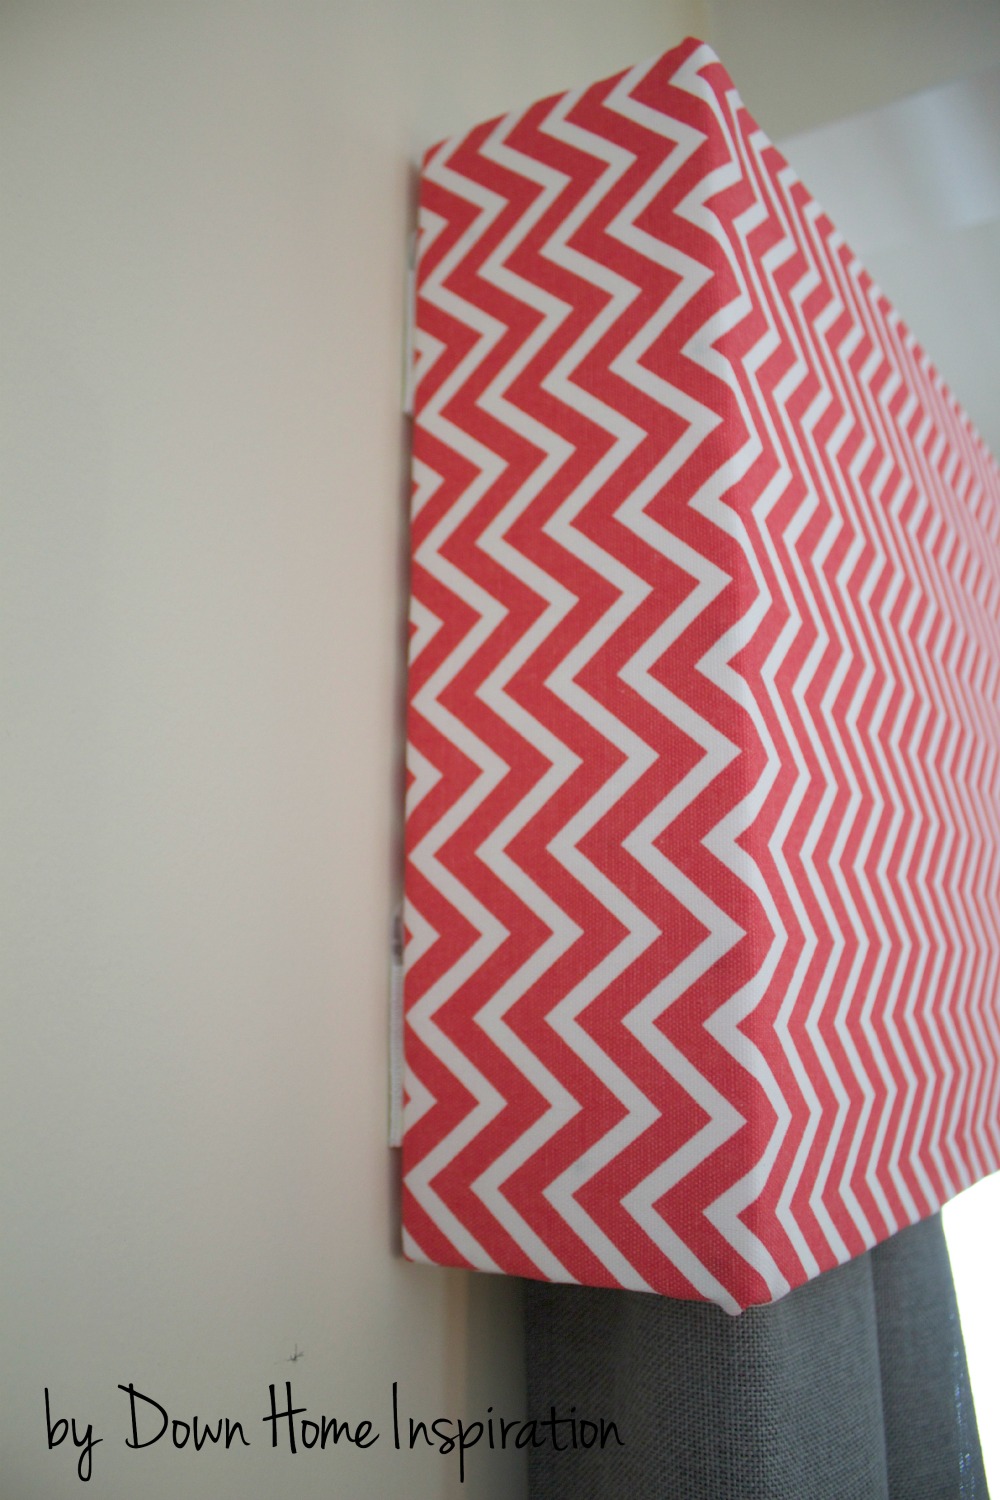
I completed my valances and made sure to reinforce the short ends with lots of extra pins. I did not want that fabric moving at all!
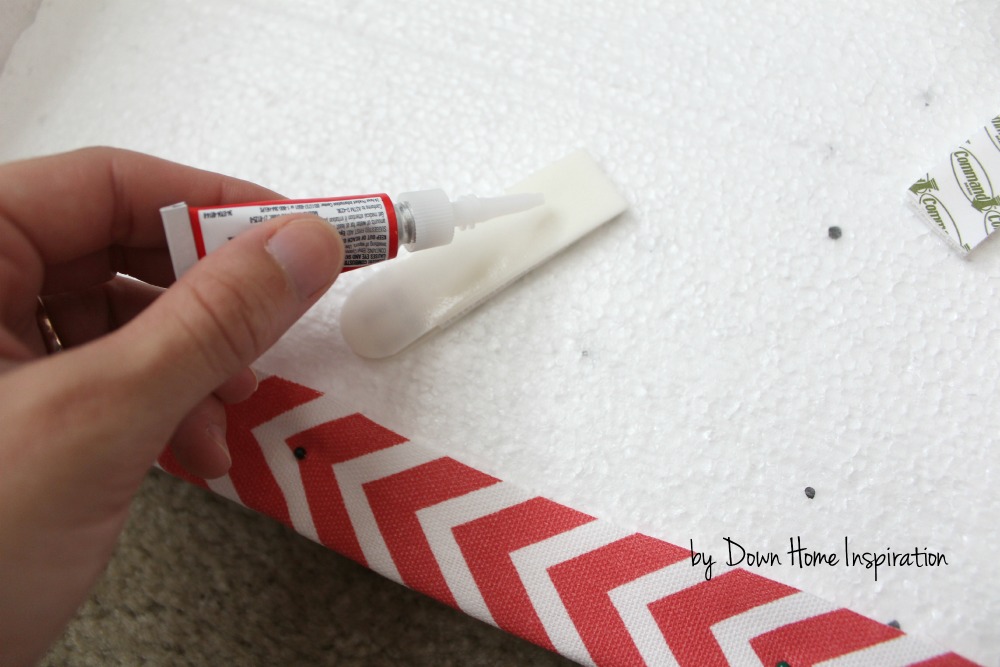
Once secure, I grabbed my favorite tool in my toolbox (super glue, of course) and some 3M Picture Hanging Strips. For my valance I used 2 medium strips on each end. I quickly applied super glue to the back side of one picture hanging strip and adhered it to the end of the valance. I repeated this step for all four strips and then I attached their matching sides (it is basically velco pieces) and removed the backing on the matching sides of the strips and pressed the whole thing firmly onto the wall.
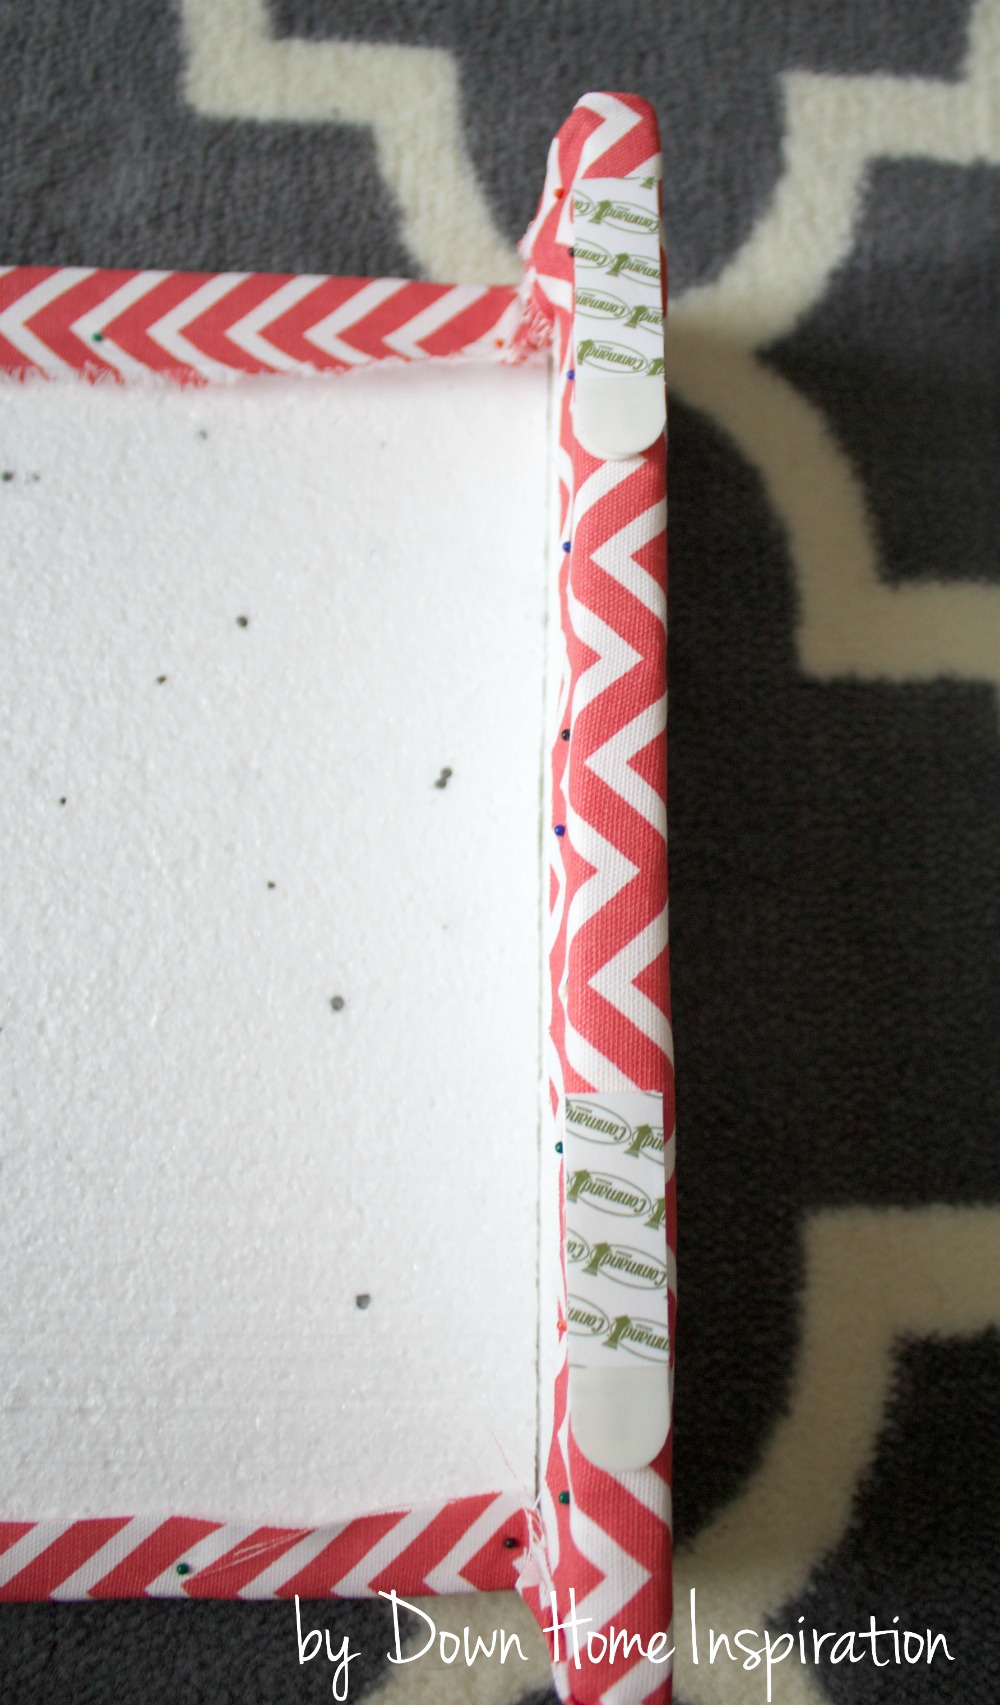
Now one side of each of the four picture hanging strips is super glued onto the valance and the matching sides that are attached to the wall are easy to pull off and remove whenever you choose to take down the valance.
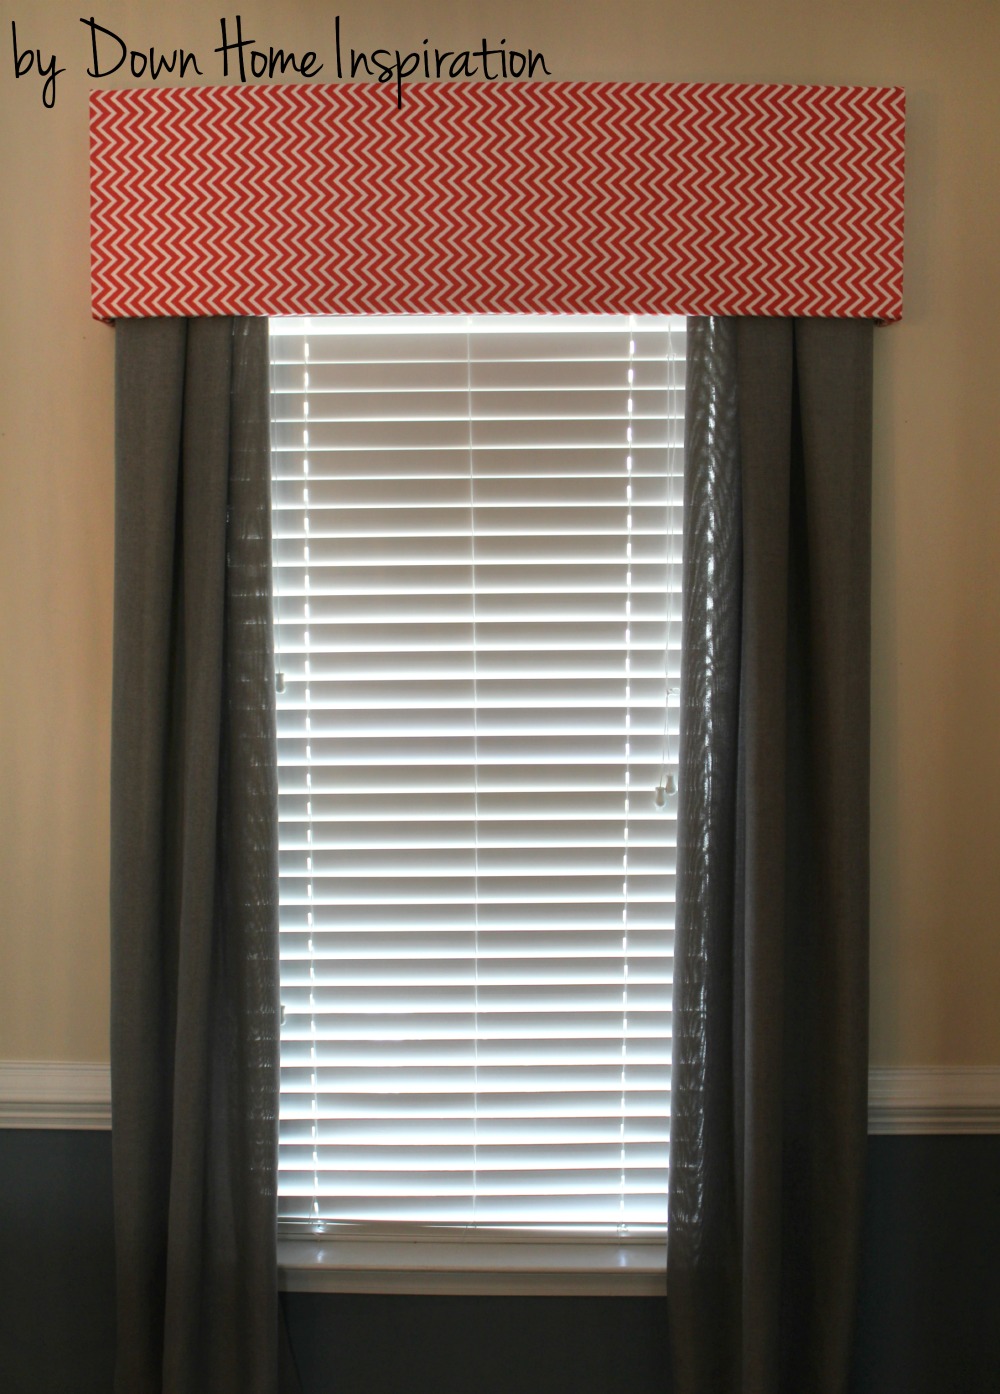
And check out what a difference this valance made in my craft room!
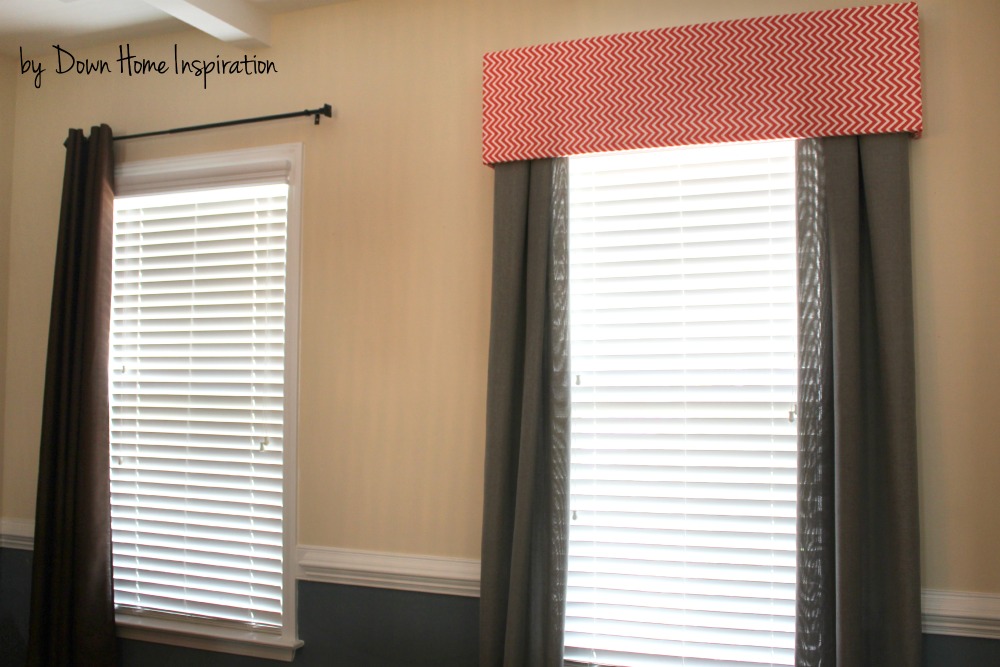
This is a great option for renters, those who would like to keep their window casing hole free and for anyone looking to build a valance around a curtain rod. I am so in love with the look of the curtains and valance together! And it’s great for my military family who never knows when we’ll get the call that it’s time to move.
Do you have any great renter friendly home improvement ideas? I’d love to hear from you!


We are a military family so this was perfect for us. Thank you! Since we are always relocating, this makes for an affordable way to make every house our “home”. I couldn’t find the package at lowes but I did find some bigger panel foam and just ended up cutting it. I love how it turned out.
Yay, I’m so glad that you were able to find some foam and that you are happy with it! There’s nothing like moving from home to home and not being able to personalize them. I know that feeling all too well, so I’m incredibly happy that you were able to add a bit of “you” to your new space!
i love your updated hanging idea! Bravo! Just had a question about the size and scale the valance should be in proportion to the window?
Hi Val, I have made both valances that are right up next to the window casing and some that allow for a curtain rod underneath. It all depends on how much space you want to be on either side of your window. For my valance with the rod under, the valance measures at 49″ across while the window itself is 36.” Hope this helps, but please let me know if you have any more questions.
Great, thanks for your help. I’ve been obsessed over chevron print lately. Your valance is super cute and sooo easy! Thanks!!!
I love this idea! So adorable! I would like to do it on my window, however it is 68 inches wide and the pieces of foam that I found are only 48 inches wide. Have you tried piecing the foam together in the middle of the valance? If so, how did you attach it? Just curious if it worked!
Hi Monica,
The largest window that I have personally made a valance for is 67″ wide and it works beautifully. I used duct tape wrapped around multiple times to hold the two pieces together. Just make sure that you either have a fabric that is dark enough to cover the silver color, or that you buy colored duct tape that will match. You’d be amazed at how well that darn tape can show through fabrics. Hope this helps, but please let me know if you have any more questions.
I hooked them with tooth picks before I taped them with packaging tape. Worked great.
Super perfect idea……love it!
For light and heat control; placing a piece that lays across the long section and sides with finishing nails that tack them together? If I use the eight foot piece of high-density insulation will supper glue melt insulation? I have vaulted ceiling with trapezoid windows that are a pain. Thank you for giving an option.
Hi Gale, I don’t see a reason why you wouldn’t be able to “double up” on the foam for better light and heat control. As for super glue, it does not melt the foam, but it can be a bit of a challenge to get into all of the little nooks and crannies to achieve a tight fit. It can be done, it just might take a little perseverance. Hope this helps!
I am so excited to stumble on this through Pinterest today. I am heading out this weekend to gather some supplies. I even read through many of the comments since my windows are a bit longer, and they are not encased, but flesh with the cement walls (old Florida home-hurricane proof. And the “renter” version works perfect for me too. Thank you Thank you!!! Have an AWESOME weekend!
Thanks Barb! I can’t wait to hear how it turns out!
Love this Idea, I am going to try to build around vertical blinds, I think your adhesive strip idea will work and I can attach right to the header rail on the vertical blinds.
Has anyone had success trying this on a sliding glass door? I’m wondering if since the sliding door is longer than a single window if the valence will sag in the middle?
I’m going to try this — my husband suggested using an extra support in the middle. The support won’t be as thick as the sides but you really don’t need much. It would only be as tall as the wall space above the slider. I’ll putting in the extra support in while i’m making the foam frame. (If you’re feeling like it needs more, you could put in a couple of extra supports. I don’t think it’s necessary but will depend on the weight of your fabric.)
Will likely cover the piece with the valance fabric to hide it in case anyone would look up.
YouTube estrena una aplicación dedicada a los
niños, YouTube Kids.
20 artículos y consejos sobre marketing «online» para negocios y … recently posted…20 artículos y consejos sobre marketing «online» para negocios y …
These are amazing directions. I used them to make my own, except I too had the issue with my window being wider than the foam board available. I connected them with some nails, craft sticks and some tape.
Oh, I too couldn’t find this type of board at the Home Depot. I used a thinner, lighter board.
Here is how I did it: https://gingercrafts.wordpress.com/2015/03/29/windowvalance/
Ginger recently posted…Window Valance
We also, have those vertical blinds and I want to hang drapes to soften that ugly blinds. The top part will definitely be easy to attach the Valance. Thank you so much. We moved here in July last year and have done little to decorate and make homey. This is my much needed inspiration.
Thanks Nancy, that made my day! I hope that you love the valances!
Wow, thank you so much for this very useful tutorial. i’v been wanting to cover my landlord’s boring matchstick blinds. I just got done making the valance.
Love from wellington ^^3
adilla recently posted…Boneka botol
Awesome, Adilla!
Great idea. I am going to make these to cover the top roll part of cheap roller blinds I am dressing up. Thanks
I have a quilt I was thinking of using to make a valance for our bedroom windows. Do you think the quilt would be too heavy to use? Also, one window is 88″ wide.
Cathy, a quilt would be too heavy. There are lots of tutorials out there showing how to make a wood valance and I would definitely suggest going that route if you have your heart set on using your quilt.
Hi, I’m still having trouble understanding what the ratio of valance to window should be. Thank you. This is a blessing to our military family lifestyle.
I noticed one comment regarding larger windows. I have been using this method for years but I buy the 3/4″ foam boards that are used to insulate the outside of new houses. They come in 4’x8′ panels (about $11). You cut them to any size and shape. I also use batting to dress them up a bit. I put a valance over my sliding glass doors – it is about 8′ long and 2′ wide. Easy and light weight. I did not know that you could buy small foam board. I’ll try that for smaller projects.
I just love your idea and finished product! How do you recommend covering a window that is longer than your standard size, such as 66″ wide? I was wondering if you can glue pieces of the insulation board together? Thanks!
Stacie, take a look at the FAQ post. I covered that question there and hopefully the detailed info will help.
I love this idea. They can be taken down and gently vacuumed with an upholster brush. Thanks for the wonderful idea.
What you have done to your house is topnotch. I would like to do the same to my blinds.
For this project, is the curtain rod attached to the wall or does a tension rod work to set inside the valence?
The curtain rod is attached to the wall. The valance is made of foam and would not be able to support the weight of the rod and curtains.