Instructions to make your own DIY Phone Charging Station Disguised as Books
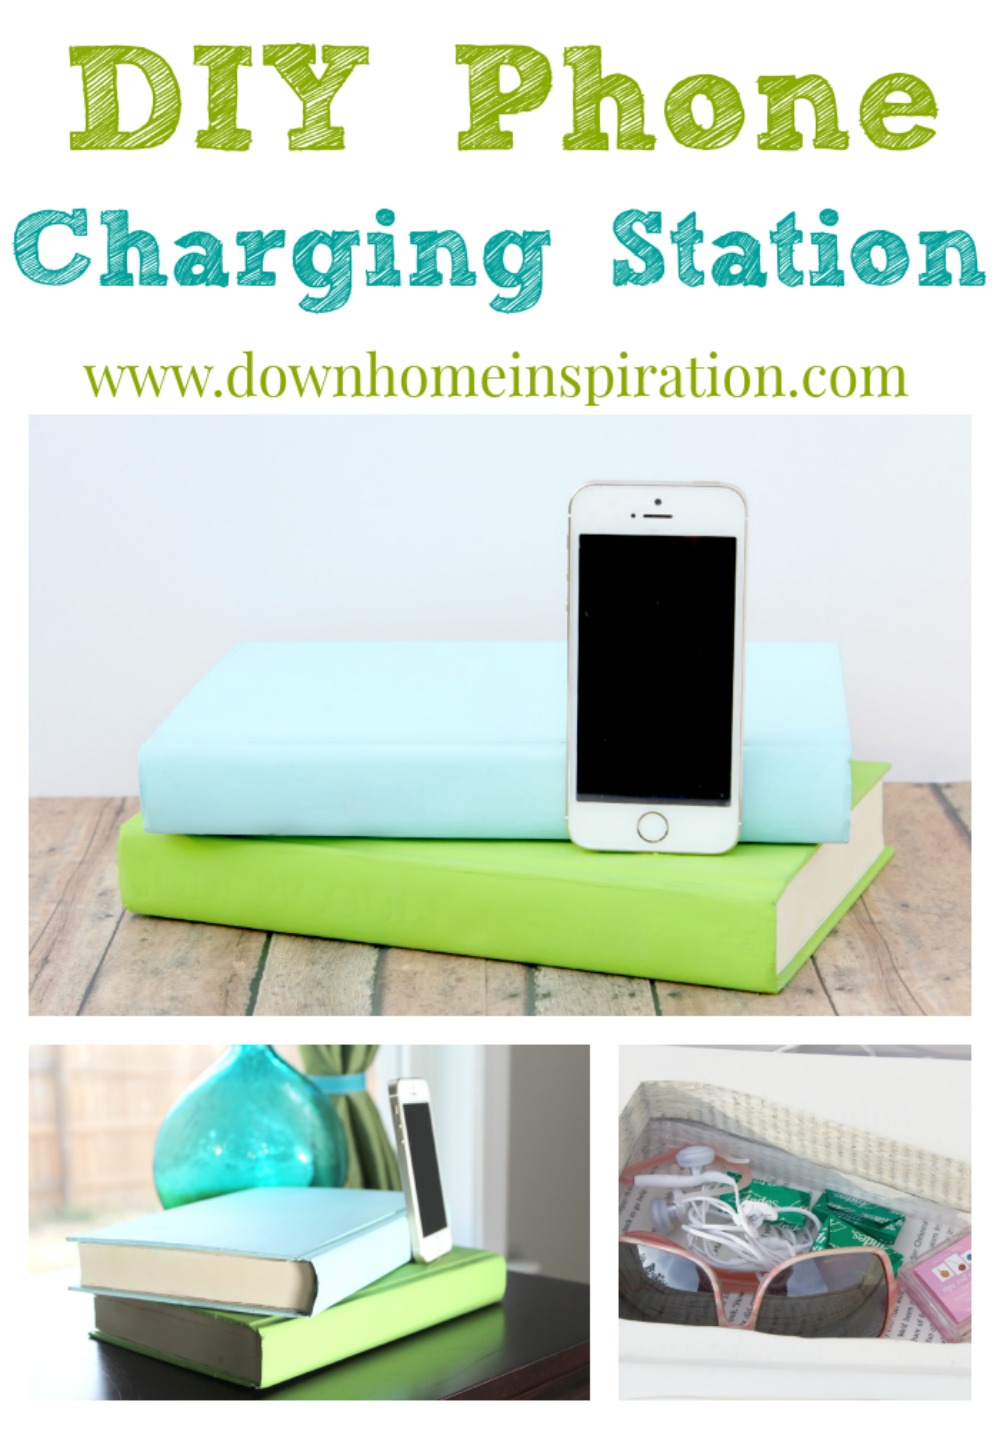
My phone charger is an eye sore on my nightstand and is forever falling behind heavy furniture, causing me to crawl around on all fours searching for it. Drives. me. crazy! Like, thought about hot gluing it to my nightstand crazy. Thankfully, before I decided to destroy my furniture, I took a quick peek around Etsy and happened upon some awesome phone charging stations that were made from books. The inspiration was fantastic, but there seemed to be a lack of options for the iPhone 5s. I assume this is because of the new charger, with a much less sturdier base than previous models. It would be hard to plug your super expensive phone, chock full of all of the info that keeps your world spinning, onto a tiny charger suspended in air and feel that it was safe and sound. I get it…I would be lost without my phone if it were to meet an untimely death. So after a little experimentation and some brainstorming with my ridiculously cool hubs, I came up with the perfect solution. My iPhone 5s can still charge on some pretty books that look totally inconspicuous while perched upon my nightstand and have a bit more stability as well as a fun hidden place to stash extras. It takes a bit of patience, but totally worth it!
Supplies
Two hardcover books (I got mine from the dollar store)
ruler and pencil
X-acto knife
white school glue and paintbrush
acrylic paint (optional)
phone charger
sanding block
drill
*I found my books at my local dollar store and did not care for the colors, so I chose to paint my books with acrylic craft paint. I did this first, but I would suggest doing this at a later time. I ended up repainting as things got smudged with pencil while I worked.

Using white school glue and a paintbrush, glue the pages of the book together. Brush a thick coat on all three sides and allow to dry while placing something heavy on top (I used a sewing machine). Make sure not to glue the covers down at this time.
Once the glue is dry it is time to decide on your layout. Stack your two books in a position that you like, making sure to leave enough space for your phone to lean against the top book with your charger coming out of the bottom book. Once you have the layout you like, trace around the top book onto the bottom. Now flip the stack over, careful to keep them in place and trace around the bottom book onto the top book. Separate the books and use a ruler to draw a new set of lines one inch inside of your existing guide lines on the top book. This will be where you cut to hollow out the books.

Using an X-acto knife on the book that will be on top, working from the back cover, cut through the cover and all pages except for the very top one and the front cover. Make sure to continue to follow the lines that you established so that it lines up well with the bottom book to create your hidden space. This will take some time and some elbow grease, but stick with it. I was generally able to pull up about 8-10 pages with each cut. After you have removed all pages (except the very first and the front cover), it is time to start on the bottom book. Stack the top book back onto the bottom using your guide lines and open the cover. Trace your cut opening onto the bottom book, marking where you will cut for the next book. Working from the front cover down this time, cut right through the front cover and continue until you have reached halfway down the book (or leaving 1/2 inch minimum uncut). Use a sanding block to clean up all edges on both books. Again, using white glue and a paintbrush, glue along all of the inner pages and allow to dry.
 This process makes quite a mess, with tons of tiny slivers of paper. I was lucky enough to get to use my new BLACK+DECKER Pivot Vac and it worked like a charm! If you haven’t yet, head over and enter to win one for yourself!
Sorry…getting off track here! With both books cut and glued, now is the time to paint if you choose. Allow plenty of time to dry.
It’s time to cut an opening for the charger now, along with a channel for the cord to come through. Start this by once again stacking your books in position and setting your phone where you would like for it to be charged. Mark the sides of the phone with small pencil lines and measure to where your charge port is; mark with another small line. Using a drill and a 7/32nd bit (for an iPhone 5 charger), drill a hole through the top cover of the bottom book at the angle you wish your phone to rest against the top book (this provides added support). Drill all the way down to the back cover. You will need to use the X-acto knife to widen the hole on top slightly (in the shape of your charger), but you want to make sure that it is a very snug fit so that your charger stays put. Feed your charger through the hole and into place on the cover of the book.
Flip the bottom book over and decide where you would like your cord to come out of the book and draw a line to the cord. Using the X-acto knife, cut a small v-shaped channel, just wide enough for the cord to comfortably sit. Finally, glue the two books together with white glue.
Okay, so it was a bit labor intensive, but it is beautiful and now I don’t have to worry about ever losing my cord behind furniture again. Here it is on my nightstand:

And how about one of the hidden storage:

And I’ll just leave you with a couple more shots, because I think it’s awesome!


Too cool! LOVE it!
Laura @ The Turquoise home recently posted…So, what ARE Essential Oils?
Thanks Laura!
So nice, Good work, imaging pictures, thanks really interesting post.