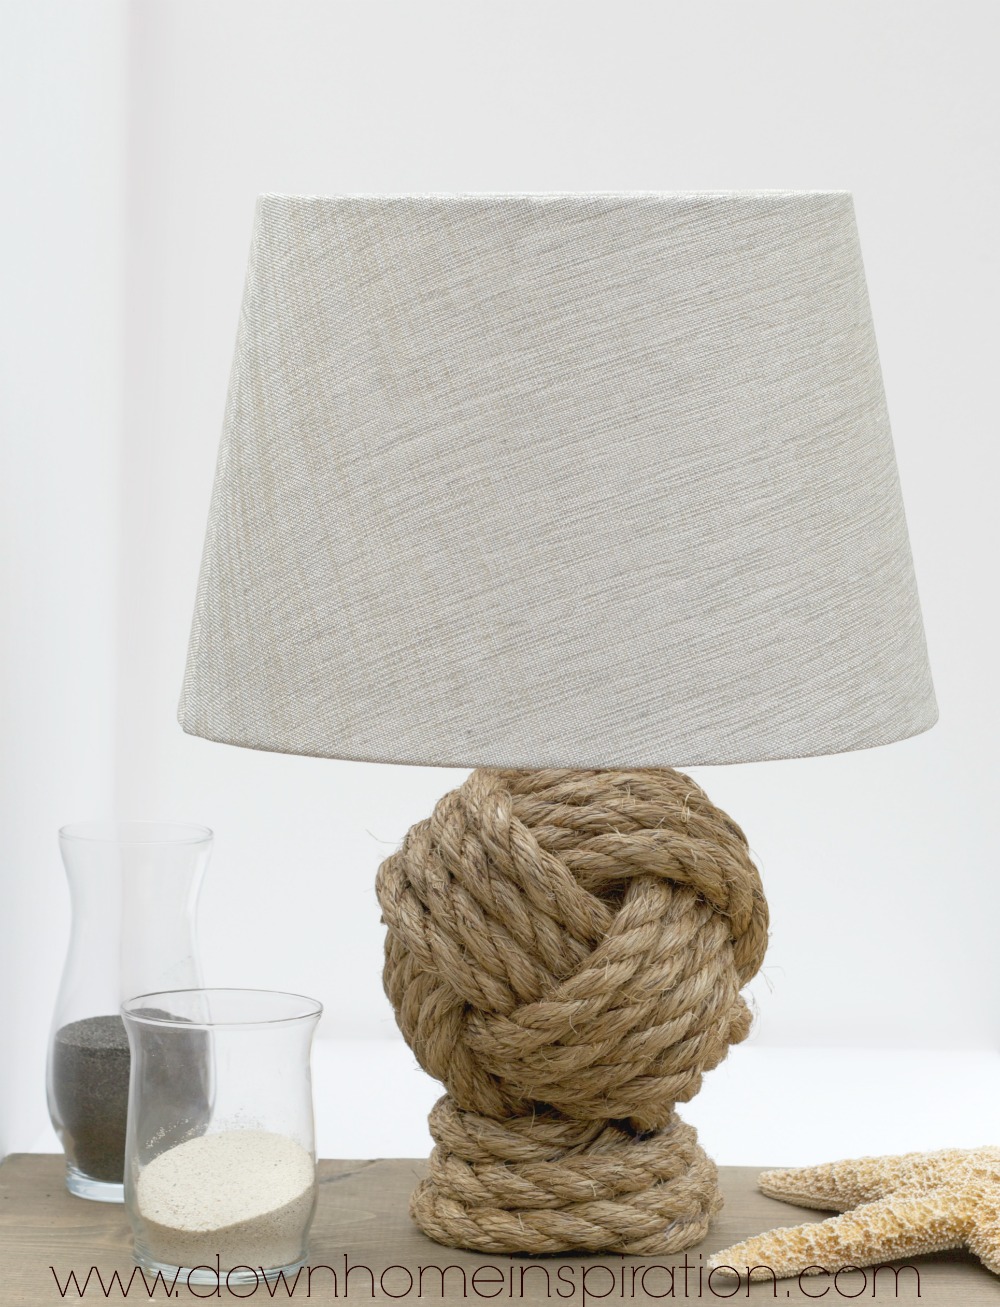
Pottery Barn Knockoff Rope Knot Lamp
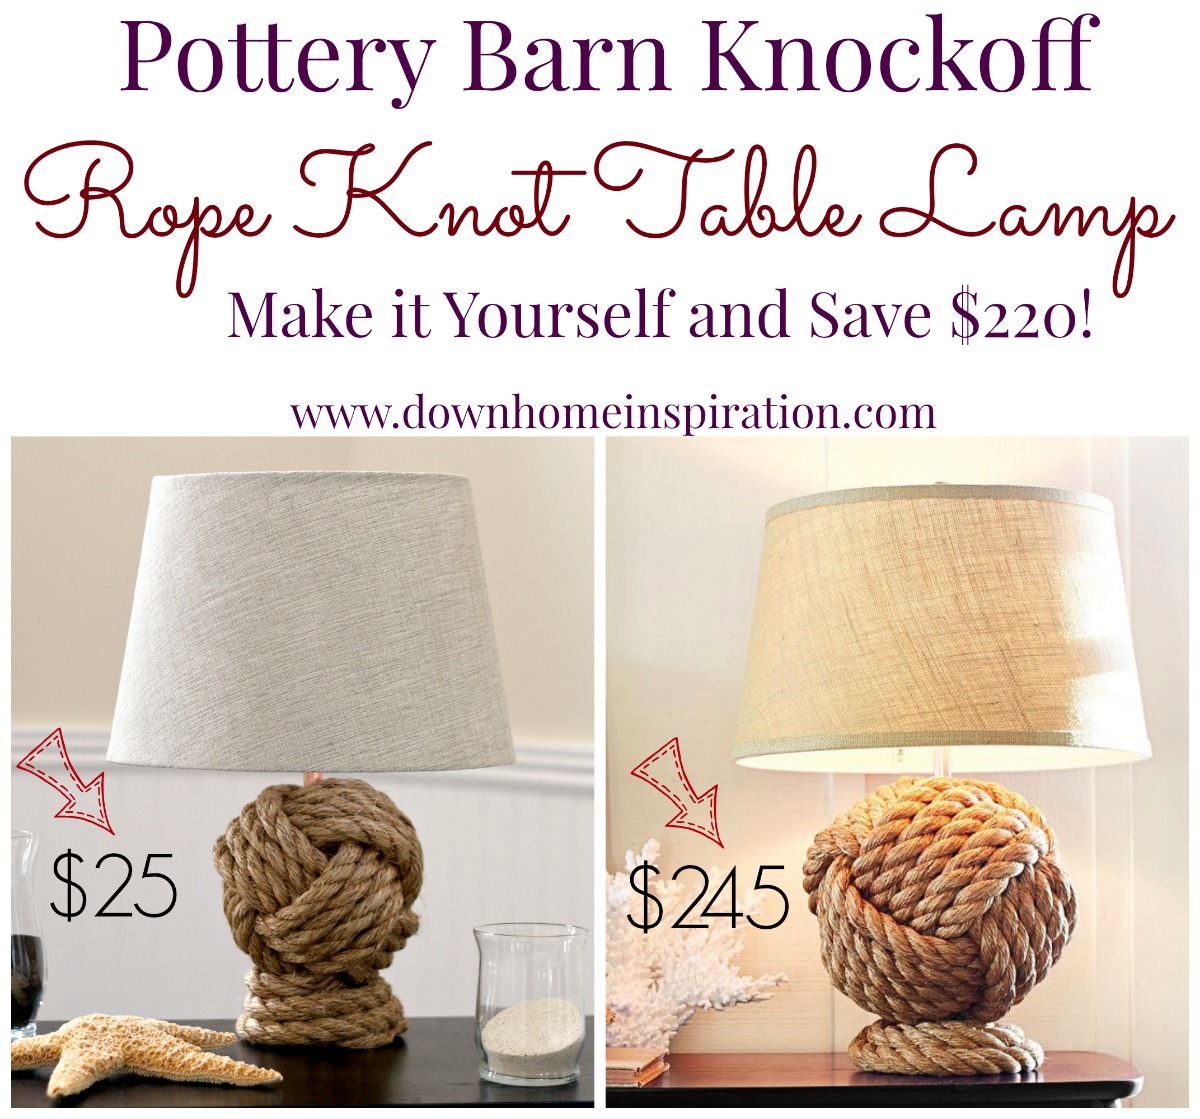
Oh my goodness, I am so excited about this darn lamp! It is such a close replica to the Pottery Barn Rope Knot Lamp that I am astounded each and every time that I walk by it. But my DIY lamp cost me just $25, compared to the $245 PB version. Can you believe that? A savings of $220 just for some elbow grease?! Yes, please…sign this girl up! Wanna make one of your own? It’s not anywhere near as challenging as you might think. In fact, I made mine in an afternoon and was basking in its glow by that evening.
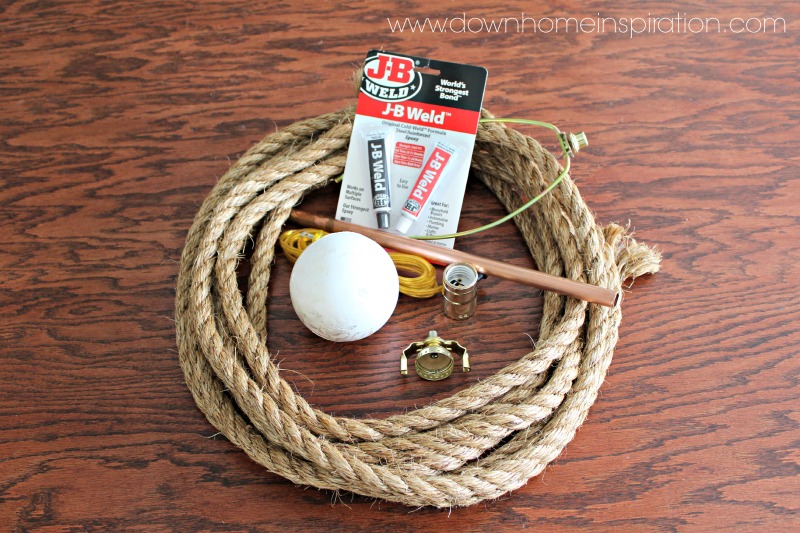
Supplies:
lamp repair kit (I got mine from Walmart for $7)
4 inch diameter hard foam ball
25 feet of 3/4 inch rope
12 inches of 1/2 inch copper plumbing pipe (could also use painted PVC pipe)
JB Weld or super glue of your choice
hot glue
Helpful Tools:
drill and bit
copper tube cutter (mine is similar to this one)
The knot on this lamp is a monkey fist, and is a nautical knot used for weighting the end of a throwing rope. While some knot tying experience might come in handy, you can find plenty of tutorials on how to tie a monkey fist knot on YouTube. If you’ve never tied a monkey fist, my suggestion would be to try it out on a smaller diameter rope first, maybe even just a rounded shoelace with a marble. As you progress, you’ll find it much easier to use a larger diameter rope. I really recommend watching an instructional video or two before attempting.
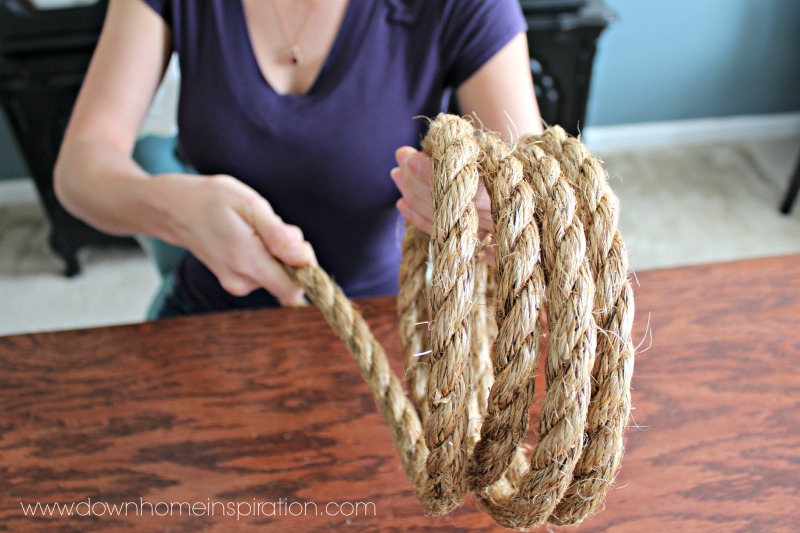
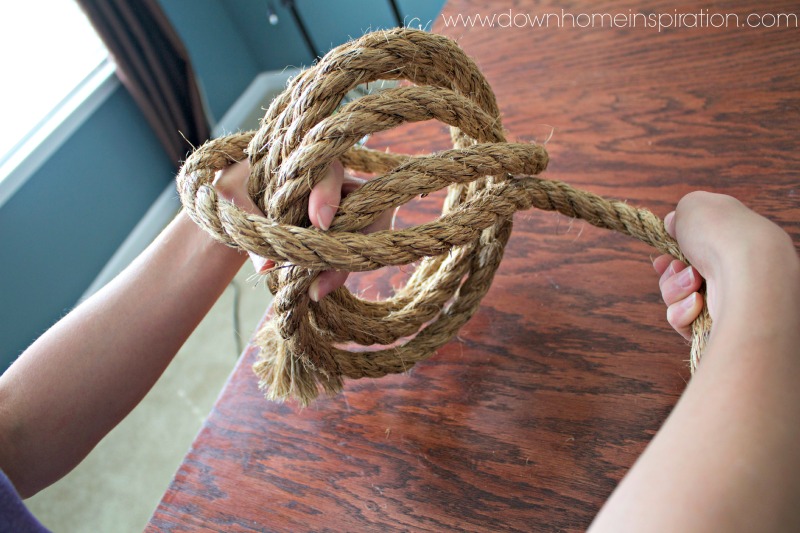
Start by wrapping your rope around one hand into four circles that are slightly larger than the diameter of the foam ball.
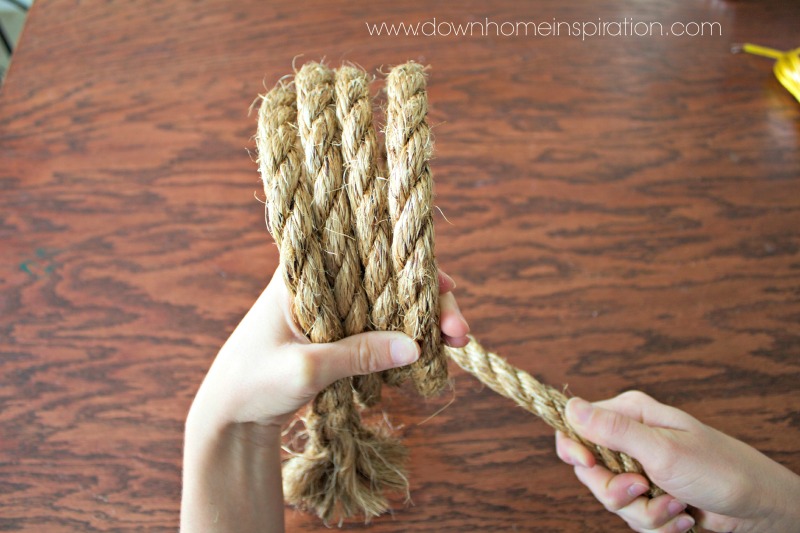
The next four circles will be 90 degrees off of the original four circles. Your first circle in this set will go in between your index and middle fingers and wrap around the back horizontally. The following circles will work from top to bottom horizontally.
Place the ball inside your existing eight wraps. Now there are four more wraps to go.
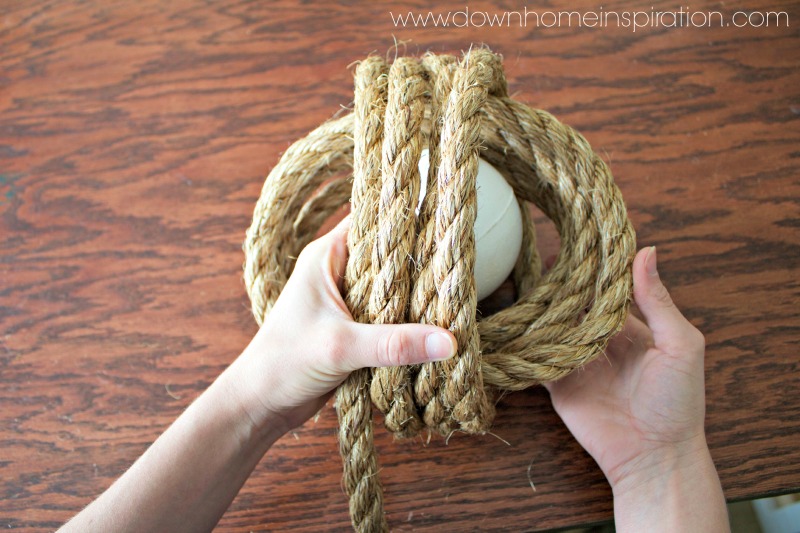
These last four wraps are going 90 degrees off of both sets of your existing wraps and they will end up going left to right in a vertical fashion. These wraps will need to go underneath the first set of four wraps and over the top of the second set of four.
You should end up with something looking like this:
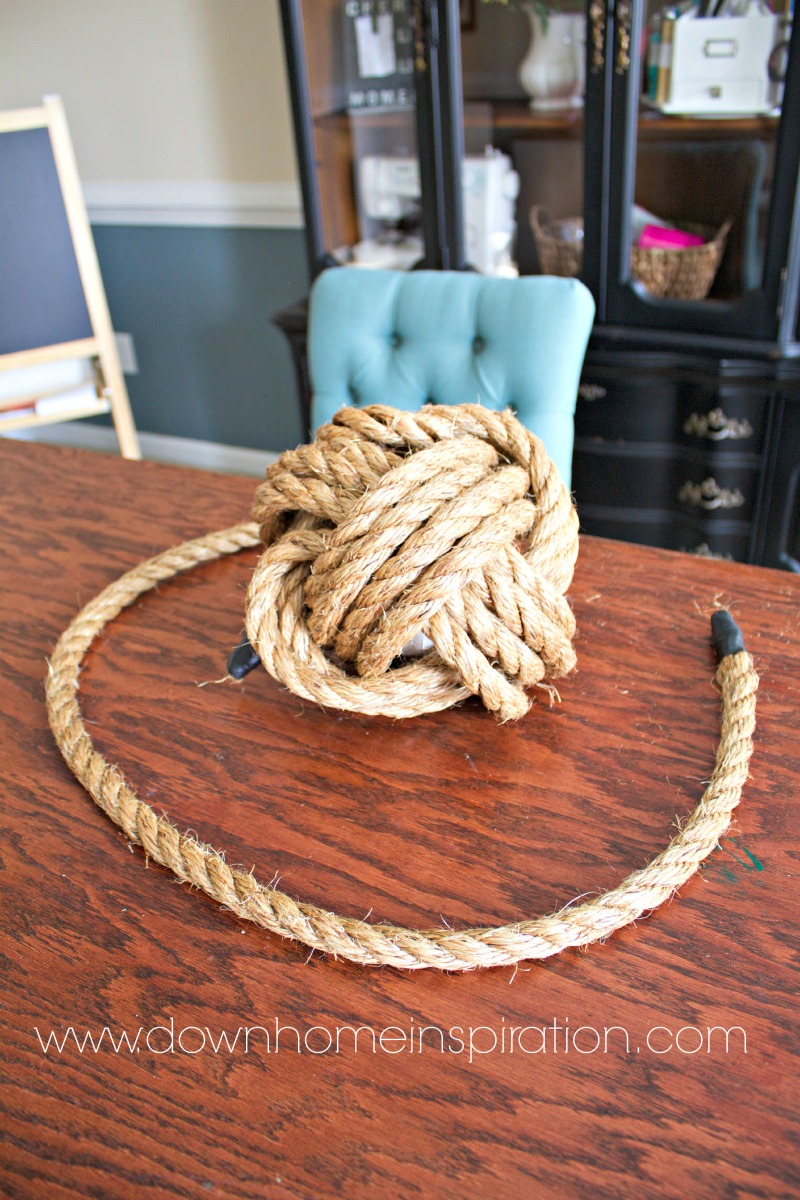
Don’t worry if it does not look picture perfect at this time. There is still quite a bit of work to do. In order to finish the monkey’s fist knot, we will need to tighten and dress it up, but we need to run the lamp wiring at this point.
Choose what you think is the best looking side and keep the long end of the rope on the bottom. This will the front of your lamp.
Pushing your rope to the side just enough to fit a drill and bit in between, drill a 1/2 inch hole straight through to the bottom of your ball.
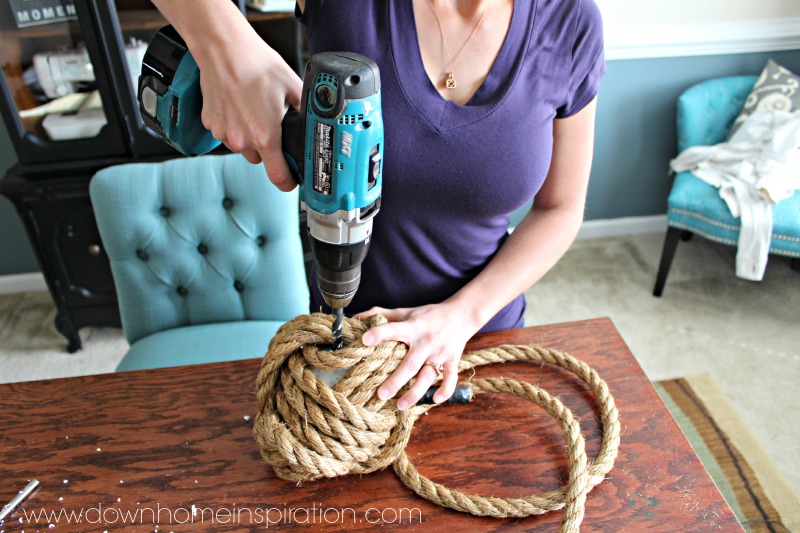
Insert your copper plumbing pipe into the hole. (Quick tip: if your copper is a bit dull looking, give it a quick scrub with an SOS pad and it will shine like new.)
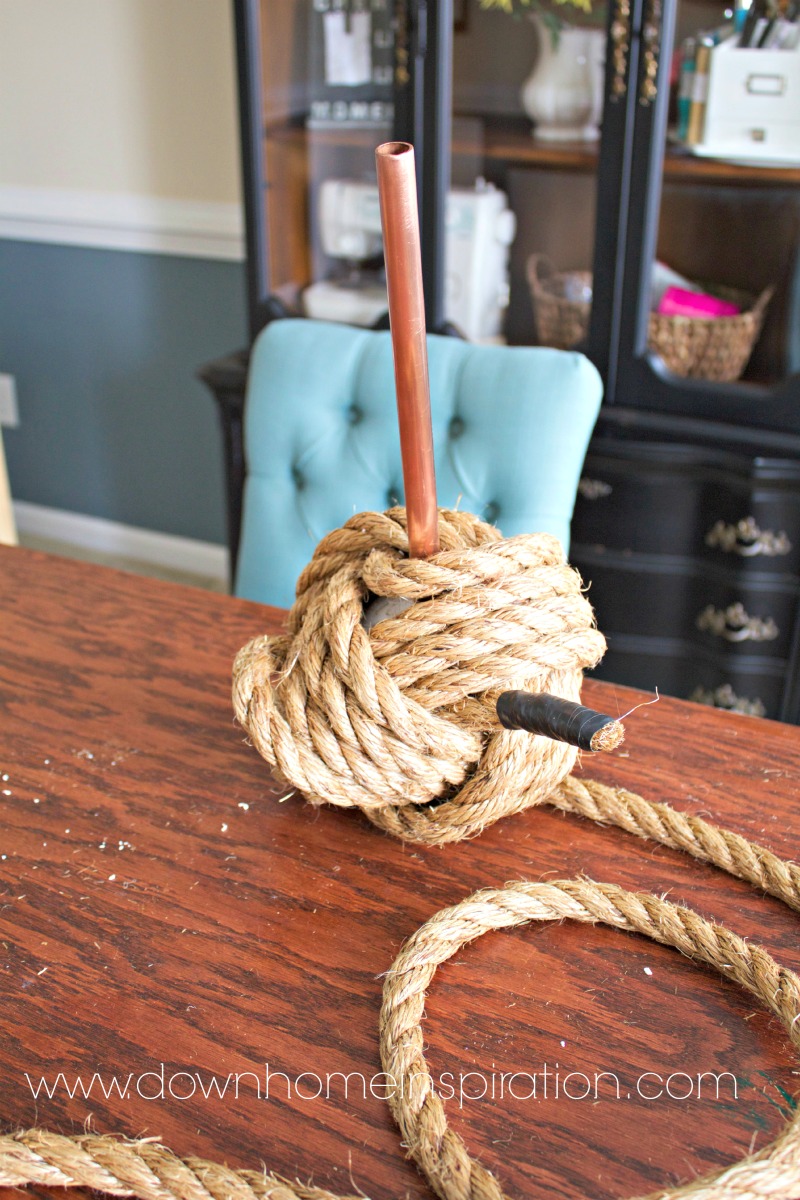
Making sure to keep the plug on the bottom of the lamp (the end that has the long end of the rope hanging), run the lamp wire through the copper pipe. I chose to tape my wire to the top while I was working so that it would stay put. I highly suggest that you do that as well if you are working alone.
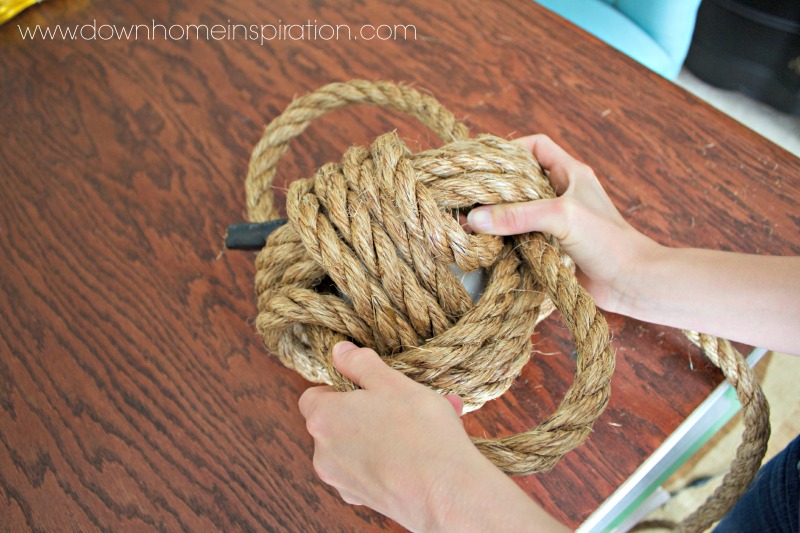
Now it is time to tighten the knot. Beginning at the point where you started tying the knot (you want all of your excess rope to be coming towards the long end of the rope on the base), hold tight and follow the path of the rope pulling the slack. Go slowly and know that you may have to repeat this step. If hand strength is an issue, you can use a screwdriver to help pry / pull out some of the slack. Be patient, this step will take a while, but it is necessary to get all of the slack out. It is better to tighten more than once than it is to risk warping the knot by pulling too much rope out. As you tighten you’re going to dress the knot as well by ensuring that all of the strands are even and aligned correctly. When finished, the knot should be hard and it should be difficult to move each individual strand.
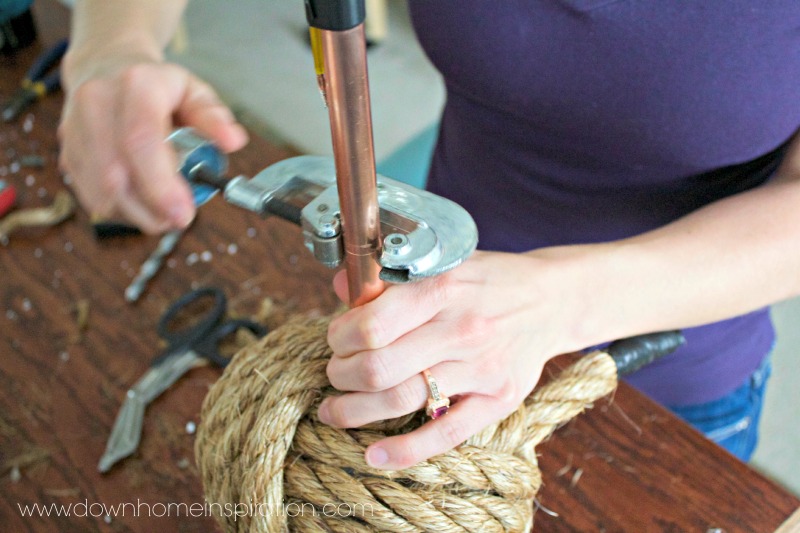
At this point, you can decide how long you want your pipe to be and cut accordingly. I used a tube cutter, but a Dremel or a hacksaw would also work well. If you do not use a tube cutter, be extra careful that you don’t cut the wire that is running through the pipe. Do a dry run by setting the fixture on top, as well as your lamp shade. I ended up cutting my pipe down to just about 8 inches tall, leaving about two inches exposed above my ball.
Once the pipe is the desired length, it’s time to wire the fixture. Follow the manufacturer’s instructions and double check to make sure that it is working before gluing the fixture to the pipe. I am a big fan of the quick dry JB Weld (not sponsored, just love it). Allow ample time to dry.
Wrap two circles around the bottom of the monkey fist to serve as a lamp base. Be sure to continually check for level, adjusting as necessary. Use hot glue towards the inside to keep the wraps together. Once you have your base, cut off excess rope (I used garden shears) and coat the ends of the cut with hot glue to keep it from fraying and tuck under the base.
Cut off the excess rope at the starting point and tuck inside the knot. If you have any bare spots where your foam ball shows through, fill with small fibers from rope and glue in if needed. I was able to just tuck them in, no need for glue.
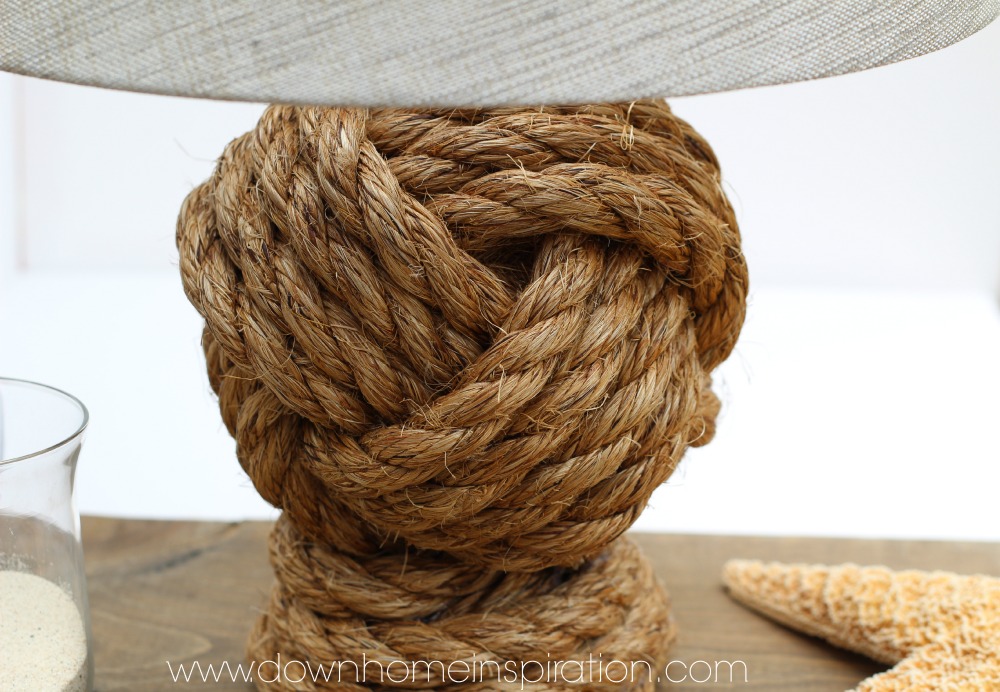
And if you made it this far, you now have a brand new Pottery Barn Knockoff Rope Knot Lamp! It took a little work, but the savings more than makes up for it! *Please note that the $245 Pottery Barn price includes the lamp base, shade, tax and shipping charge.

Isn’t is beautiful? I just love it so much! One more beauty shot…
Big shout out to my super cool hubby for taking such awesome pictures and keeping me company! Love ya!
Linked at Savvy Southern Style, A Stroll Thru Life, Domestically Speaking, House on the Way, Carolyn’s Homework, Ginger Snap Crafts, DIY by Design, The Everyday Home, Seasoned Homemaker, The Newlywed Pilgrimage , Practically Functional, Serenity Now


Wow! It turned out awesome!!!! What a nice going away present this would make for a close friend who’s about to move! (kidding, of course!) I’m totally going to try this tutorial out!
Melissa@TheHappierHomemaker recently posted…The Great Playset Shape Up: The Plan
Haha, Melissa! I am keeping this baby!
You make this look easy!!! Gorgeous lamp!!
Ricci recently posted…Plexus Slim
Thank you Ricci! It really was not as complicated as it looks. 🙂
Impressive! I am always inspired & amazed by people who are gifted in visual artsy crafty stuff.
jeanae recently posted…Wordless Wednesday: Mantle Letters
Thank you Jeanae!
Oh my word, this is totally genius and you are so clever. Fabulous tutorial. I love, love, love it. Thanks tons for linking to Inspire Me. I will be using this as one of my features for next week. Amazing. Hugs, marty
Marty@A Stroll Thru Life recently posted…Adding Bling To The Chandy
Oh thank you so much, Marty!
I agree, this was pretty awesome! I wish I had this gift but alas, I’ll enjoy vicariously. Thanks for sharing!
Cece recently posted…Hiding In Plain Sight
Thanks Cece!
Kristen, this looks amazing and even better than the original! I’m so happy you shared this at Moonlight & Mason Jars to I was able to see this and great tutorial! Pinning and thank you for sharing!
Cindy Eikenberg recently posted…I’m Guest Hosting at Moonlight & Mason Jars!
Thank you so much, Cindy! That is so kind!
I am in awe that you made that. When I first looked at the picture I didn’t know which was the knockoff, they both looked equally professional.
skye recently posted…Captain America: The Winter Soldier – Eight Things I Loved
Wow, thank you so much Skye! That’s an incredible compliment!
Seriously?! This is so amazing- great job! I am totally pinning this and try it at some point when I feel like I’ll excel, haha.
Jennifer B. recently posted…National Cinnamon Crescent Day | Cinnamon Crescents
Thanks so much, Jennifer!
Have to hand it to you, doesn’t look that easy to me. I”d have to have hubs make it as my hands are no good anymore, worst part is having lost strength, fingers have twisted, total bummer. I’ve had to learn how to do some things in different ways or just not do some things at all. You did such an incredible job with that rope, didn’t it hurt your hands? Have to hand it to you for keeping at it. I’d love to have lamp like that, great looking, love your lamp shade. Happy Spring days pinning
Thank you Jane Ellen! It did take a bit of hand strength, but I used a screwdriver to help me get leverage. My mother, who has RA has many hand issues, so I can certainly understand.
This turned out fantastic, what a great knockoff! I’d love it if you shared this over at The Makers link party going on at my blog, UpcycledTreasures.com.
Have a great weekend!
~Katie
Katie @ Upcycled Treasures recently posted…Upcycle it! Weekend Project Inspiration
Thank you Katie! I’ll definitely hop over and link up!
Wow, how creative and talented you are! I like yours better in all honesty. Gotta love a PB knock off!
You are so kind, Marie! Thank you so much!
Oh my goodness, I can’t believe how stellar your finished lamp looks! Really – – I prefer it to the PB version! My hubby and I have a nautical style, so this is right up our alley. Thanks for the tute!
Lauren @ The Thinking Closet recently posted…Wreck This Journal: A Perfectionist’s Nightmare
Thank you so much, Lauren!
Amazing and inspiring! I wouldn’t have even attempted that. I would’ve never guessed that it wasn’t a PB lamp…it’s looks exactly like the $200+ lamp.
Erlene recently posted…Fantastic Friday Link Up #28
Thank you Erlene! I am pretty proud of it, if I do say so myself. 🙂
Kristen, this is amazing!! I don’t think I could make sense of those knots, but you did an incredible job!!
It looks more confusing than it really is, Emily. Watching videos definitely helped me.
I absolutely love it!!!! Thank you so much for sharing on Twirl & Take a Bow! Pinning! 🙂
– Brooke-
DesignedByBH recently posted…#MommyIsCooCoo Over Google+ – Come Grow Your Circles!
Thank you so much, and thanks for hosting a great link party!
Wow- that turned out so good! You are a smart one! I’d be impressed to look at that too!
Oh thank you, Liz! That’s so kind!
Hello! I am loving this lamp! You really did such a fabulous job. It looks just as good or better than the PB one! Thanks for sharing- fun finding you on The Lovely Ladies Linky.
Amy @ItsAMindfulLife recently posted…A Co-Host Small Victories Sunday Link-Up Celebration!
Thank you so very much, Amy!
wow, this looks so amazing! great job, seriously!!! Thanks so much for linking up last week at Creativity Unleashed. You will be featured tomorrow on the blog!! Hope to see you back. 🙂
Jocie@OPC recently posted…How to Build a Wall-Mounted Lumber Storage Rack
Wow, thank you so much Jocie! I will definitely be back! 🙂
Absolutely fabulous!!!!! Terrific DIY on this one for sure! Linking back from Serenity now
vel recently posted…Recent Scores
Thank you so very much, Vel!
I made 2 of these for my nautical inspired bedroom. They came out perfect and I’ve received countless compliments. Thanks for this tutorial!
Yeah Leticia! I would absolutely love to see them! If you get a chance, please send a pic or two to downhomeinspiration@gmail.com. So excited that you are loving your new lamps!
Great job Kristen, very neat and professional looking. I’ve made rope doorstops from sisal before, and while it’s not tricky to tie the knot (I used a Turks Head knot instead of a Monkey Fist for those), getting everything adjusted ‘just so’ so the tensions are even all the way can take some patience.
The sisal rope I had was very bright and ‘new’ looking, which didn’t suit the project I had in mind, so I pre soaked it for a day in super strong tea with extra spices (aiming for a warm med-dark brown shade, plus the spices added a nice smell) then dried very thoroughly before using it. If you wanted another colour you could soak with something like diluted water based paint instead.
Since I needed plenty of weight for the doorstops I used gravel wrapped tightly in a plastic bag then taped thoroughly into a ball shape – while I’m not sure how you’d do such a thing for a lamp project, I suspect the added weight would be helpful in preventing the lamp from being blown or accidentally knocked over. Perhaps even a bit of weight (lead sinkers?) glued into the base circles would be helpful if that’s an issue with yours?
Keep having fun making your home beautiful!
Claire, I love the idea of soaking rope in tea. I haven’t had any issues with my lamp being knocked over, but adding weights to the bottom is a great thought. I bet that your doorstops are beautiful! I love turks head knots!
I love love love this project. Thank you for the tutorial, you did such a fantastic job! I’d love to make one for my mum for mother’s day. Could you share the break down of how much your supplies cost and where you found them? I’m really curious as to where you found the lampshade and rope without breaking the bank. Cheers!
Hi Eri, it has been awhile since I made this lamp, so I honestly don’t remember the entire breakdown on costs. I purchased my rope from Lowes, I just had cut what I needed. The lamp shade was around $10 from Walmart, but I had been using it on another lamp at the time. Thrift stores would be a great option too if you are looking for a great deal on a lamp shade.
Love this idea! Where can I buy the rope?
I bought mine from Lowes, but any hardware store should work. They have a place where you can cut the exact amount that you need.
Literally one of the hardest projects I’ve tried (mainly because I’ve never made a monkey fist before). And the rope was hard to keep together without the help of my husband. I would love to know a break down of what each piece cost. Even with my military discount at lowes it was over $30 not including my shade that I haven’t purchased yet. Thanks for the tutorial though! I can’t wait to put this at my in-laws new beach house this summer!!
Hey Stephanie, hang in there! This is definitely a more challenging project, but once you get the hang of the knot, it all comes together. I don’t remember my exact cost breakdown as this project was made quite some time ago, but I was able to get it all for under $25 (other than the shade, which I had on hand – but was totally from Walmart!). Keep with it and I’d love to see a pic when you are done!
I made this lamp yesterday and it was definitely tricky at first since I’d never made a monkey’s fist knot before. However, it was fun (and, I’ll admit it, sorta frustrating) to figure it out, and once I got the hang of it wasn’t that complicated! I had 1/2 inch rope on hand, so I did 5 passes instead of 4 to minimize the amount of the ball that would show through. All together, mine cost under $20, without a lampshade (which I have yet to buy): styrofoam ball, $3 (AC Moore); rope, $8 (Hobby Lobby–I have plenty left over from a 98-ft. rope); lamp kit, $6.50 (Walmart). Mine is a bit on the small side–~7 inches–so I’ll probably use it on a side table with some other stuff. I may even be adventurous and try to make a larger one that is closer to the size of the original PB one. I guess I’d need an 8-in. ball for that. Anyway, thanks for the inspiration and tutorial! Great project!
Just wanted to add, I found brown 3/4″ rope at Home Depot for $.67/ft incase anyone has a hard time finding it. Also, one thing that made tying the knot a TON easier was taping off the ends like shown in the pictures–that way the end is easy to find and loop through for the last few passes in which you loop under the first set of turns.
Yay, glad you love it Andrea!
I’m super excited to give this a try. How big does the base end up being? Is it possible to make it bigger using a bigger Styrofoam ball and presumably more rope?
Thanks for the excellent tutorial!
You could absolutely make the base bigger with a larger ball and more rope. Mine is about 6-7″ wide.
Question: couldn’t you just put your hole in the foam ball for lamp wiring first. Then wrap your rope directly on to the foam ball tightly while hot gluing it to the ball. And when you’re done it would be all tight and nice the first time through? Then add rope to wherever else is needed using hot glue and tucking in and gluing any excess cut off pieces of rope?
Well I guess since u have to pull the rope through and under and over some that it wouldn’t work. But there’s gotta be some easier way to do it instead of going back again to tighten isn’t there?
I wish that there was an easier way, Megan, but I don’t know of one. 🙁 I think that is the case with a lot of knot tying…that you have to go back in to tighten. I’m no master, by any means, so you may be able to find an easier route online somewhere. If you do, please let me know!
The article you shared regarding rope lamp is fantastic. Thanks for your great project…
Top Home Zones recently posted…Understanding Natural Ventilation Systems