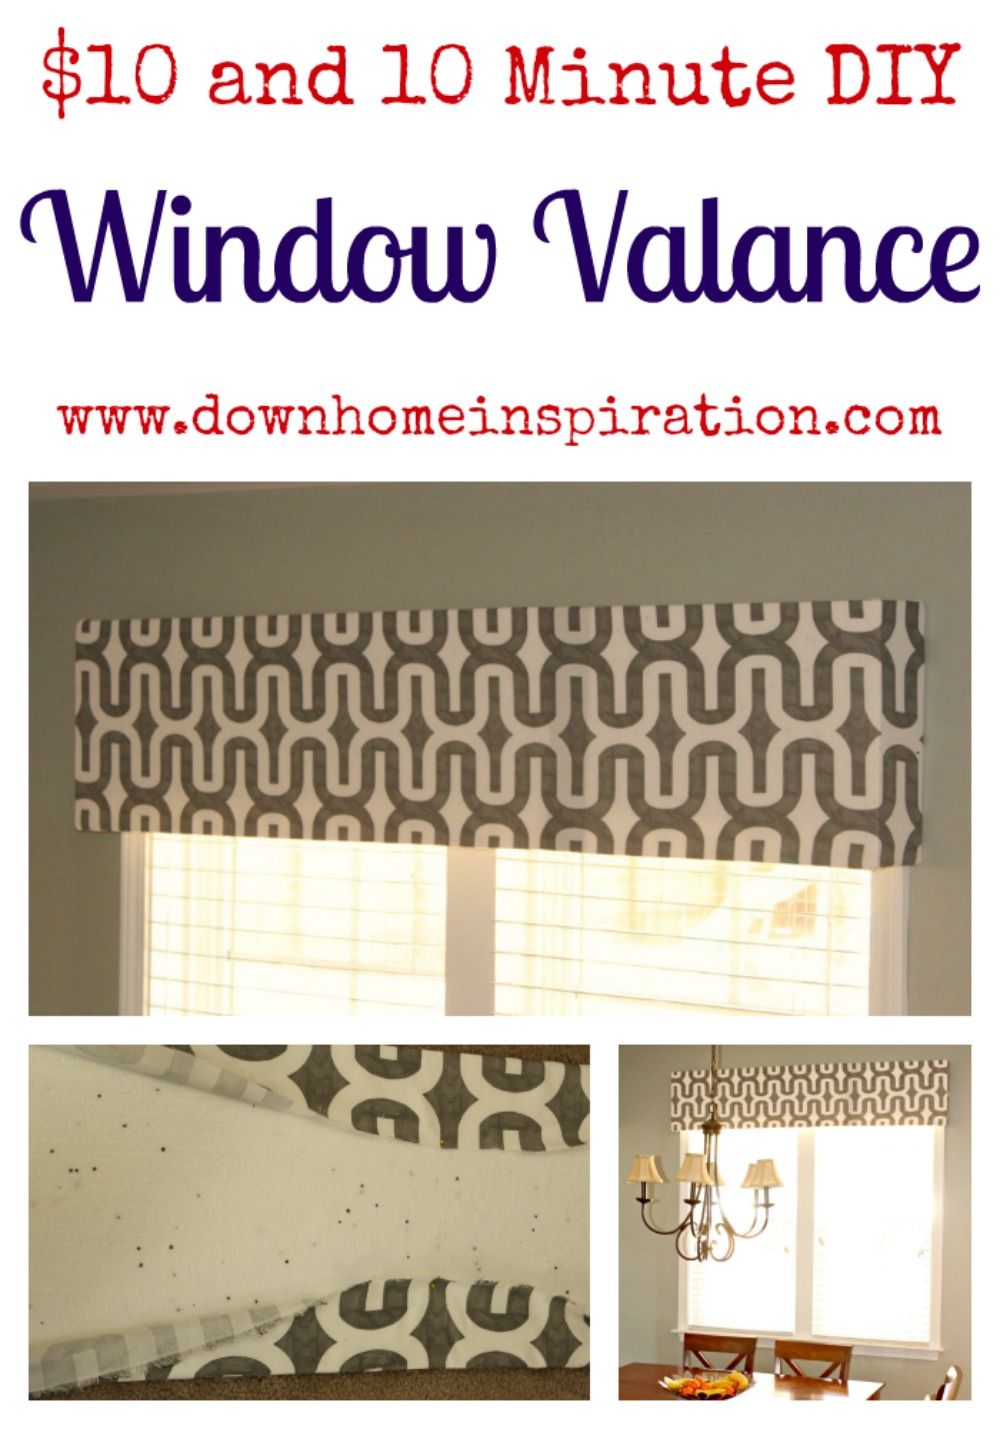
Because this post has become so popular, I’ve since updated it by showing how to hang the valance with no damage, and no holes to be renter friendly. Check it out here. I’ve also added a FAQ post that answers the burning questions sent to me by readers that can be found here.
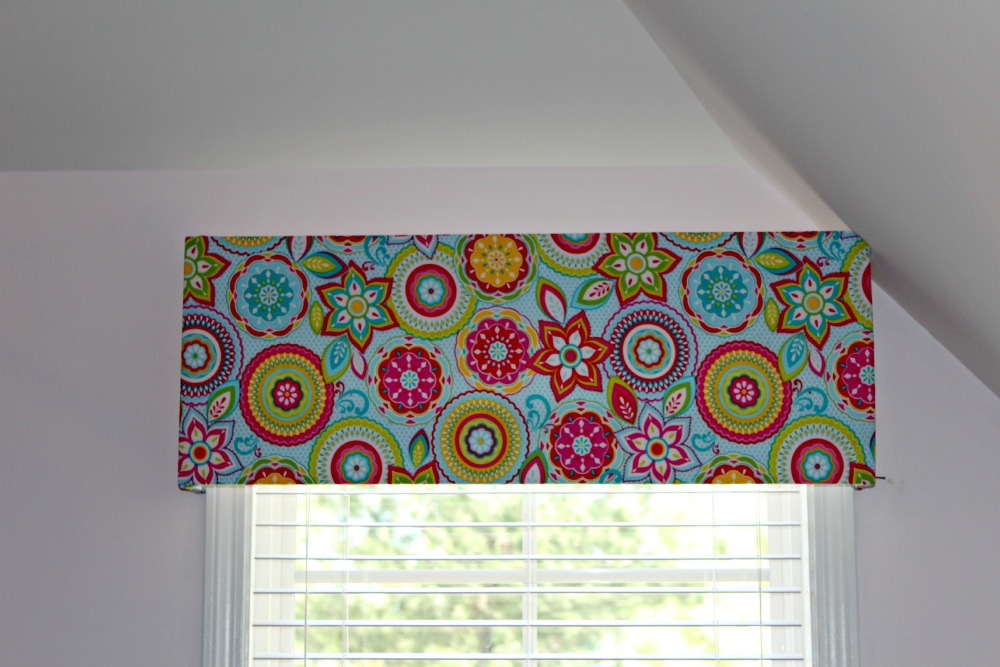
There’s just something about a well dressed window that makes a room feel complete to me. It’s like a nice statement piece of jewelry…it adds a pop of excitement and “look at me” attitude. I have had a couple of windows in my house that were giving me a bit of a decorator’s headache by just having plain ol’ wood blinds with none of the pizzazz of curtains or dressings of any kind. The weekend seemed like the perfect time to take matters into my own hands and tackle that project. And I just wish that I had known how incredibly fast, cheap and easy it was, because I would have done it so much sooner. I spent $10 and 10 minutes to make my own DIY window valances and here’s how:
Pick up a package of panel foam like this:
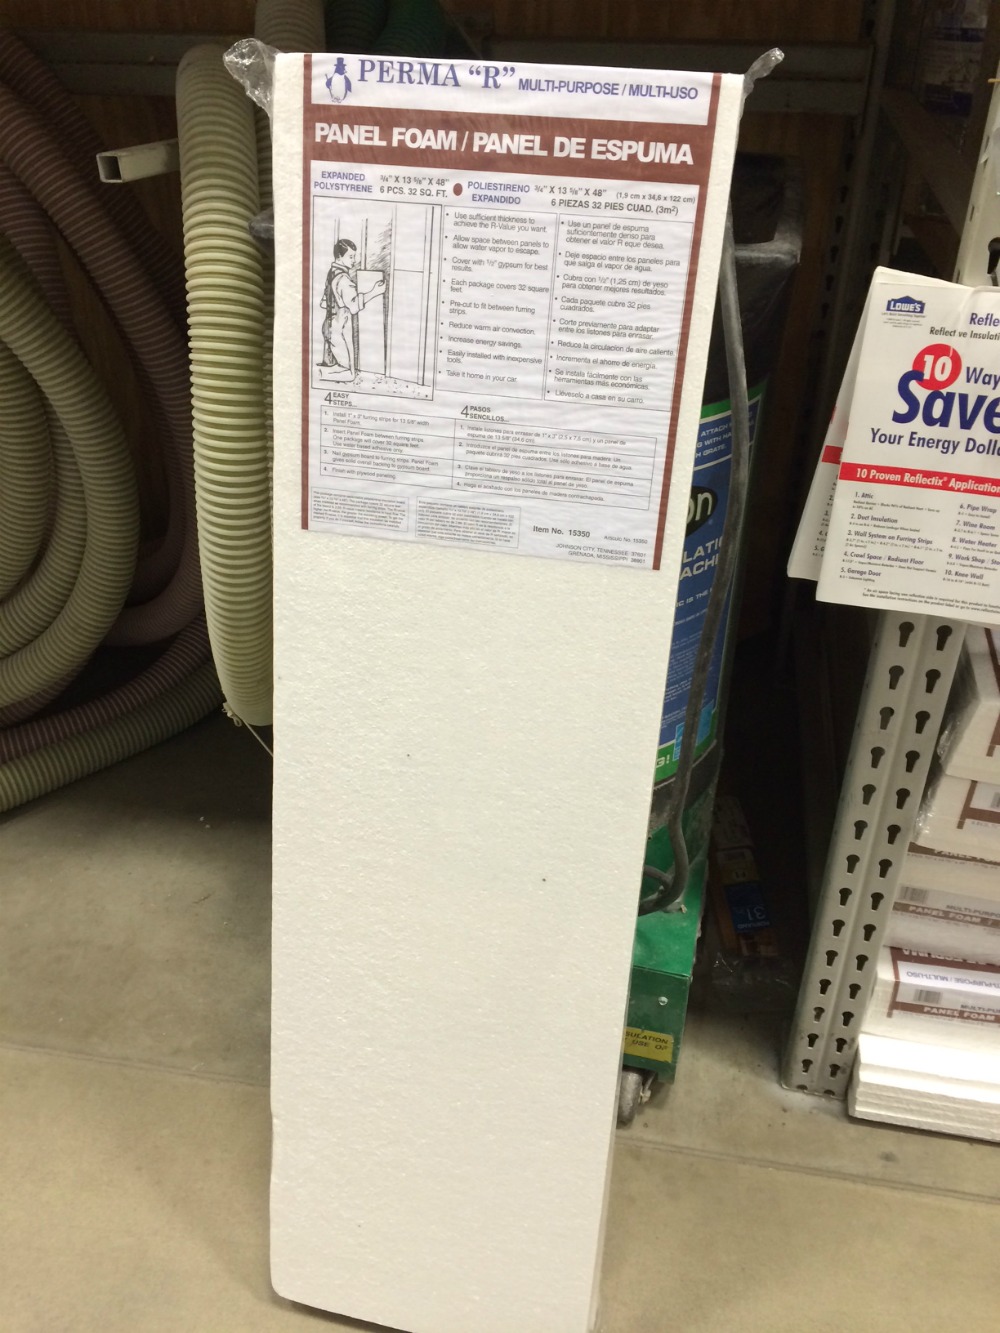
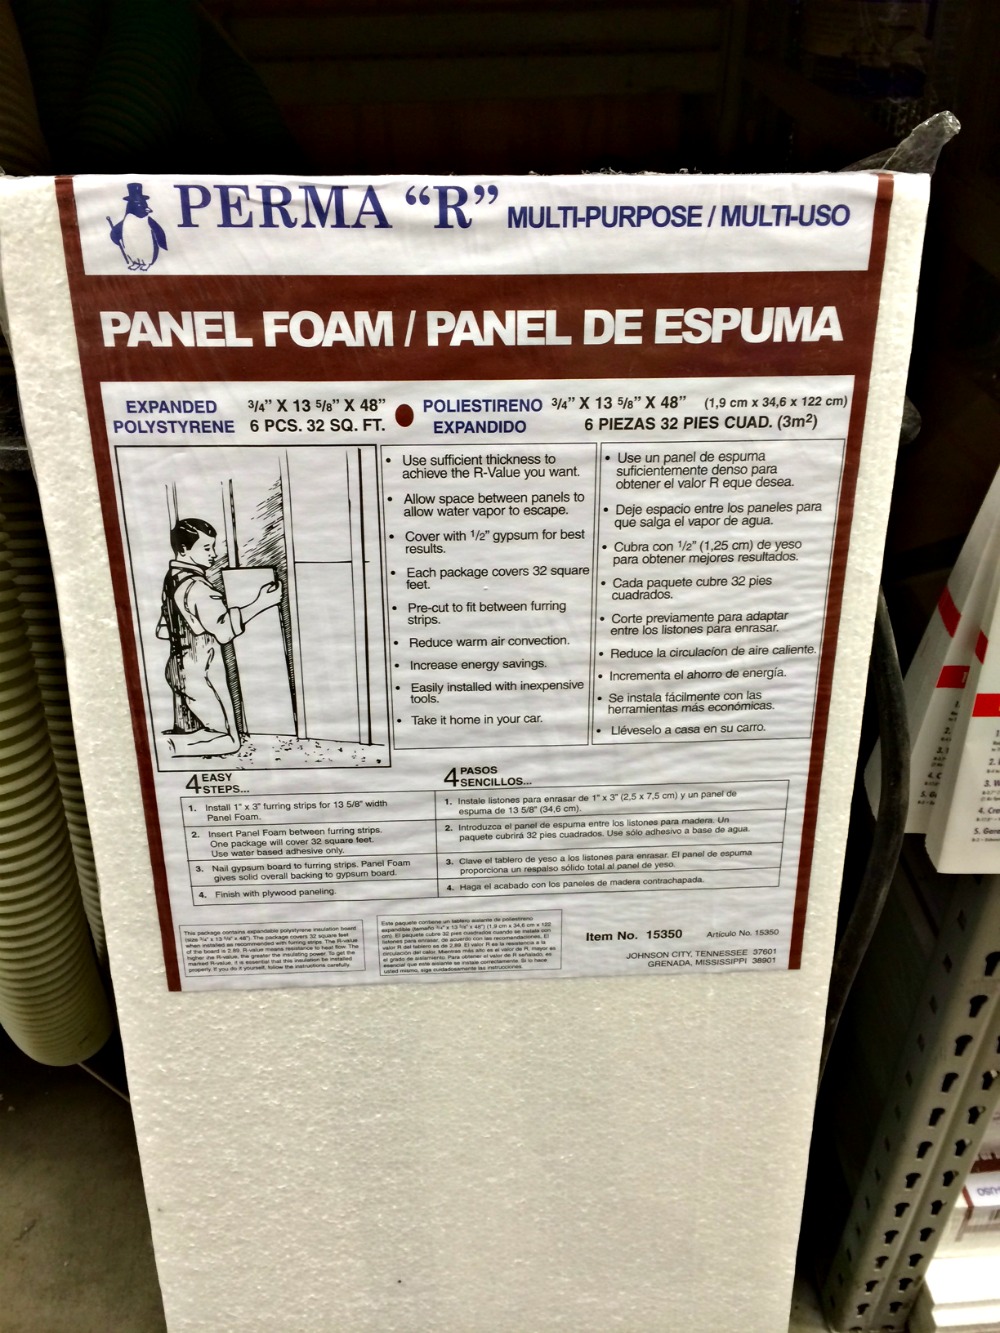
I bought a package of this stuff at Lowes for $9 . It’s already fairly inexpensive, but you can do multiple windows with this package. I have done four in my home and still have a full sheet and a half left! Measure your window from the outside casing to the opposite casing. This will be the length that you will need to cut your foam to, and you’ll need this measurement to help you determine how much fabric you will need.
You’ll need some great fabric (make sure that you get your fabric cut so that is long enough to cover the entire foam board, plus about 8 inches). And lastly, you’ll need some straight pins and some finish nails.
To get started, cut your foam to the desired length (outside casing to outside casing) using a serrated knife. Now cut two pieces that are 3 inches wide to serve as the sides of your valance. Once cut, attach them to your long piece of foam by using a few finish nails per side and just pushing in with your hand.
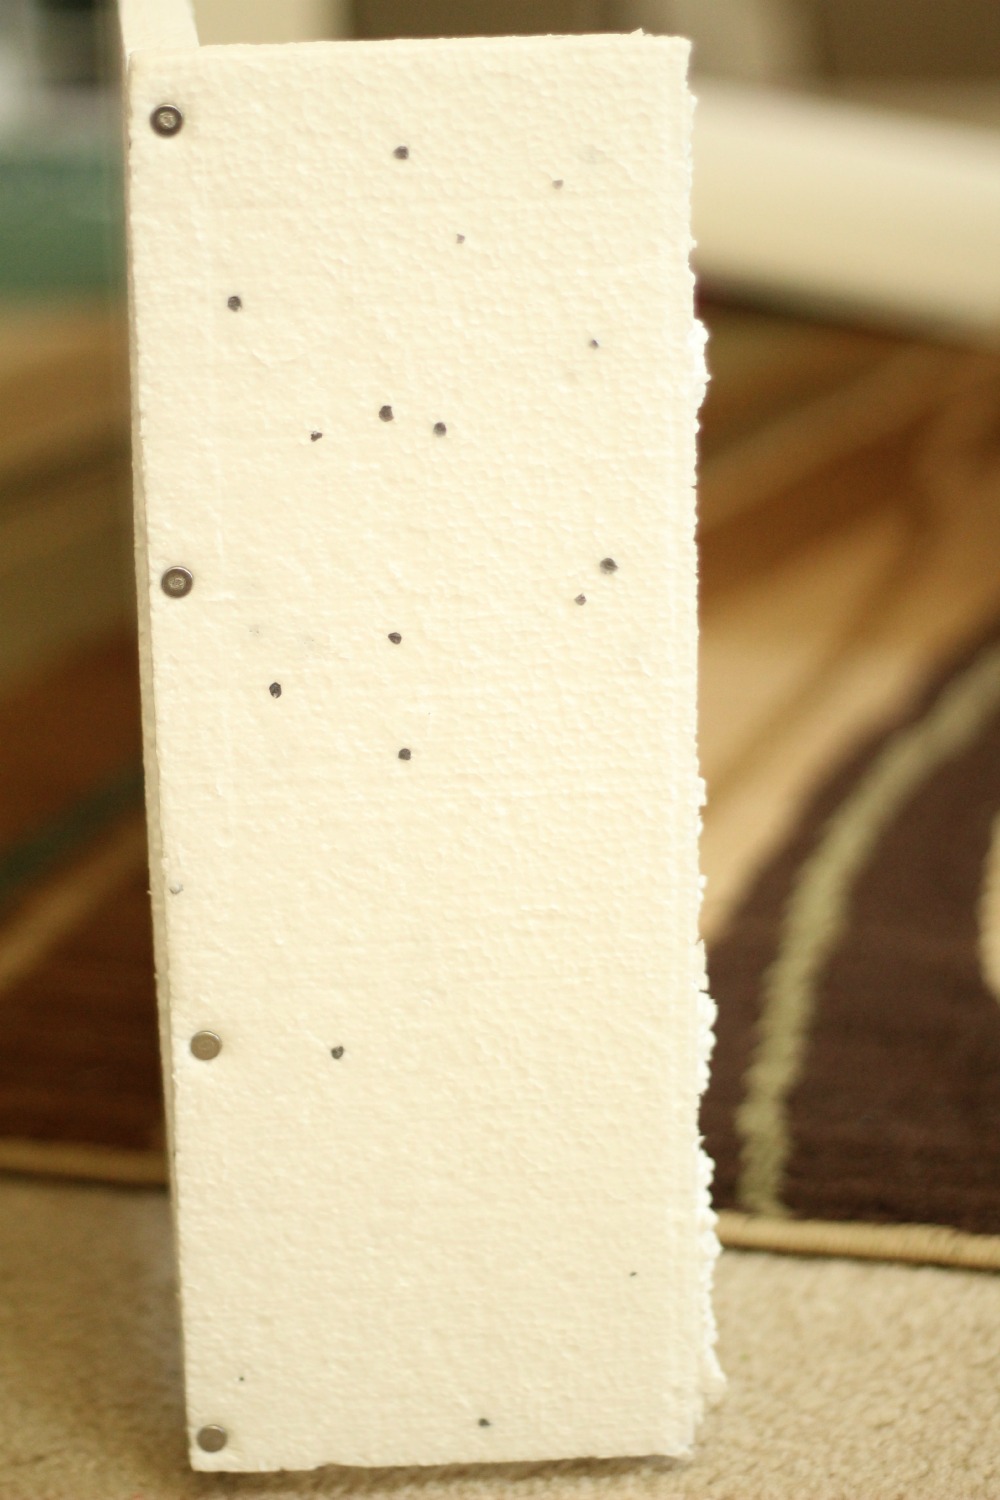
Now it’s time to cover the valance with your fabric. *Note: because the foam has small gray specks in it, make sure to either use a colorful or thicker fabric, or to put a white layer underneath. You don’t want to have a pretty white fabric with gray polka dots peeking through at you.* I choose to do this with straight pins for two reasons. 1, I am a lazy crafter at times and it is super quick and easy to use the pins and 2, you can change out the fabric anytime that you like without damaging your foam valance. Start in the middle and pull the fabric taut, inserting your pin at an angle to prevent it from poking through your fabric in the front. Next, pull the opposite side nice and tight in the middle and pin again. Working back and forth from one side to the other will help keep your fabric straight. Pin about every 2 inches or so.
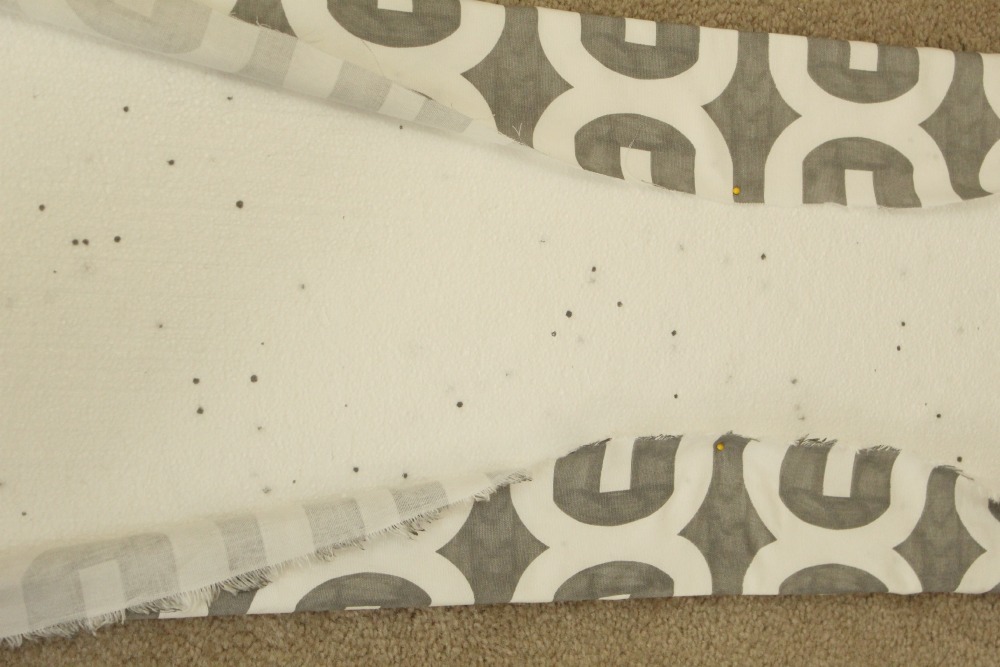
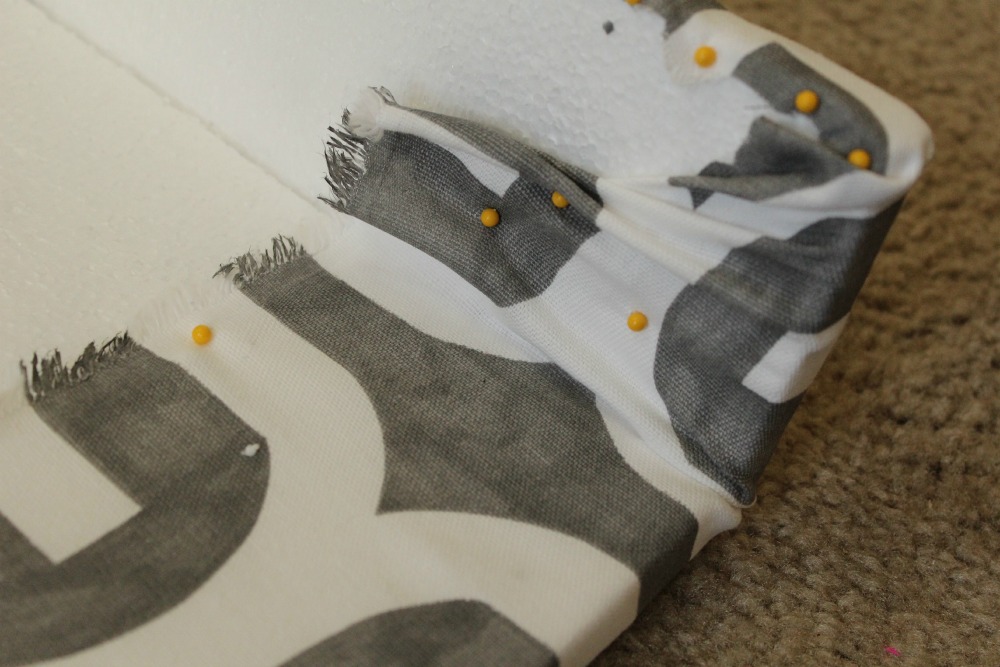
Continue pulling tight and pinning along the entire length and sides of the valance, leaving the corners for last. The corners are a bit tricky, and you may end up just folding the fabric until you can get it to lie flat. Remember, it doesn’t matter terribly what the inside looks like as no one will be seeing it. Use as many pins as you need.
Easy enough, right? Now we are ready to hang the valance on the window. I used two finish nails and hammered at an angle directly into my window casing. If I ever decided to remove the valance it would only leave very small holes.
And now my room feels much more finished and complete. I also did this in my daughter’s room, where the angle of the ceiling made it impossible to hang a curtain rod. I can’t decide if it is the look or the ease of the project that I love most…
Linked at Savvy Southern Style, Ginger Snap Crafts, DIY by Design, Everyday Home, Seasoned Homemaker, Crafty Allie, Practically Functional, My Repurposed Life, Design Dining and Diapers and The Turquoise Home


Love this!!! So glad you posted a tutorial, this is a great project for renters too since it’s so easy to attach to the walls!
Melissa@TheHappierHomemaker recently posted…When you Don’t Have a Craft Room or How to Hide Your Crap, I mean Craft
It’s perfect for renters, Melissa! I have even heard of people hanging them using Command Hooks so there is no damage to the walls.
I don’t understand the hanging part. I’m slow with this!
Suzy, you aren’t slow at all! I think that I need to go more in depth with it as there have been multiple people saying the same thing. Keep an eye out, I’ve got a FAQ post coming up in the next couple of weeks with lots more detail! In the meantime, if you are still struggling, shoot me an email at downhomeinspiration@gmail.com and I’ll try to help out.
I did not think of the larger sheets of foam. I just used form core presentation board. The 2 side flat are the perfect length for the over hand. On my longer window I just put both sides together. I used hot glue to hold sides together. The cornice with fabric attached is so light that I just laid it over the cheap white 2 1/2 or 3″ curtain rods. Stays in place with no problem.
Love this tutorial! So simple and easy thanks for sharing 🙂
Thank you Refunkjunkchic!
Great idea1 Love the fabric you choose!
Lisa @ Charlie The Cavalier recently posted…Compression Socks for Travel Announcement
Thanks Lisa!
This would be so perfect in my kitchen. I love all the openness of our windows, and do not want the busy look of curtains in an always busy place. That being said the large main window’s bareness yells at me constantly! Girl, you are going to keep me busy, and I love it!
I know what you mean about feeling like it is yelling at you, Melissa…it drives me crazy! 🙂 If your windows are larger than a sheet of the foam, I have heard people have had luck duct taping pieces together and I would probably stabilize somehow on the back. Maybe use glue stir sticks and attach those at the seam.
I love this! I am a little bit confused on how you hung them with the nails though….
Hi Amanda, I used finish nails and nailed the sides of the valance directly into the trim around the window. If you’d like more info or maybe a picture of the sides of mine, please feel free to email me at downhomeinspiration@gmail.com and I’d be happy to help.
So you nailed through the outside of the valence (fabric and all) into the trim? Am I getting this right? Can you see the nails? How stable has it been so far?
Yes Kate, that is exactly what I did. If you are right up next to the valance you can see the tiny heads of the nails. It has not moved at all and has been very stable. I do have a no hole, no damage version of the valance that you can check out as well: https://www.downhomeinspiration.com/dig-window-valance-renter-friendly/
What if window has no frame? How would you hang?
LOVE this, Kristen! I’ve seriously wondered how to do this as I’ve had friends say they’ve made their valances with foam core. But I need a tutorial, so this is perfect. Now I’m trying to figure out where I can put on in my house. Thanks so much!! Pinned!
Laura @ The Turquoise home recently posted…Work It Wednesday No. 40
Thanks so much Laura!
This is fabulous! I’ve been wanting to do this over my kitchen window & yours is by far the best (easiest & cheapest!) tutorial I’ve seen! Can’t wait to try it out 🙂
Thank you Andrea!
My windows do not have casings at the top or sides. Any ideas as to how I could hang these with no casing to nail it to?
Hi Amy, I’ve heard of people using Command Strips before, but I have not tried it. I use the picture hanging strips all over my house and I think that you could probably make that work. I would super glue (don’t use hot glue – it will melt the foam) a couple of strips onto each side of the foam. Please let me know if you end up doing it, I’d love to hear about it.
suction cups possibly? or from the ceiling if it would look good snug up against the ceiling.
This is SUCH a great tutorial!! Your entire blog is awesome and I just got sucked in for longer than I care to admit. You’re truly doing a wonderful job :). And my next house will have these valances in it. Like 20 of’em.
Thanks so much, Niki! I so appreciate your sweet comment!
Can’t wait to make these valances for my bedroom. If you don’t mind me asking, where did you get the adorable fabric?
Hi Kandace, I picked my fabric up at Hobby Lobby. They’ve got some great choices!
Thank you!
I had a hard time finding this stuff at Lowes or Home Depot. The closest thing I found was a foam insulation board, but I’m nervous that it won’t hold the nails and pins, or stay in place after I hang it. Its similar to the type of foam used for shipping, etc and its 1″ thick. What department did your find yours? Is what I found like yours?
McKenna J, you could probably use insulation board, but it would end up being costlier. I would suggest taking the picture that I posted of the foam board and asking an employee about it. I am currently fighting a flu, but when I am feeling better I will head to my local Lowes and track down the exact aisle that I found it on and update.
I live in Puerto Rico and our houses are all made out of concrete… and there is no molding or window casing. The windows are actually metal. Anyways… Any thoughts on how to attach these? Command strips tend to not stick on cement, especially when it is damp (which is all the time on a tropical island). I absolutely love this idea and it seems cheap enough to satisfy my missionary family budget!
Hi Dana, that’s a tough one. I would think that because the valance is so light that you would be able to glue it to the wall using some masonry glue. Of course that would be a bit more permanent. Maybe using small pieces of wood (think paint stir sticks) and use hot glue to attach those to the wall, then attaching the valance to the wood with super glue (cannot use hot glue on the foam – it will melt through). That way you can remove the wood pieces when needed. Please let me know if you try or if you come up with another solution. I love Puerto Rico, we had a fantastic vacation there! 🙂
Maybe magnets would work.
How would “seam” fabric for a window that is wider than your fabric?
Allison, are you talking about seaming together two pieces of fabric? I think that if you were to do that you would want a patterned fabric that you could “hide” the seam in a bit. Otherwise it might stick out like a sore thumb.
About seaming…instead of a single seam in the center..two seams (1 on the L, 1 on the R) equally distant from the corner. Topstitching on both sides of each seam gives a professional look too!
I love this idea! I am going to do it this week. Could you possibly email me a picture of how nailed the valance into the window casing?
jessie.heal@gmail.com
Thank you!
I sent you an email Jessie, please let me know if you have any more questions.
Love this valance! But I’m confused on the hanging of it with the finishing nails..: I hammer the nails into the wall or window casing and then push the foam into them? Please email me if you can / thanks !
Hi Shelley, I just sent you an email. Hopefully it helps!
My windows are 69-1/2″. Do the panels come in longer lengths or is there a way to put two pieces together?
Katie, I have not seen the foam in longer pieces. You could connect two pieces of foam, but you would certainly need to reinforce it somehow. If I were going to do it I would duct tape the two pieces of foam together and use paint stir sticks to reinforce. Make sure to have the stir sticks in the middle of the joint.
Thanks for the great idea! I wondered if maybe I could just cut two pieces evenly to make up for the total length then hot glue another piece on the back to reinforce it? I did look at Lowe’s today for the panels but I wasn’t able to find them.
Do NOT use hot glue. It will eat the foam. You could use super glue though. It seems as though each Lowes keeps them in different areas. I would show them the picture (if you have a smartphone) and they should be able to direct you.
Hello!
I love the look of these but I had a lot of trouble finding them at Lowes, where in the store do you get them from. .. I took a picture with me but the employees could only direct me to the 8 x 4 boards. Any help would be wonderful, Thanks!
I found them today at Lowes but NOT in the section with foam panels — they were over with the “kits” and stuff that is wrapped together to be sold as a bundle, not where the individual sheets are sold.
Thanks for the awesome tutorial! I am thinking of making a valance for a 12 foot long window. Do you have ideas for connecting to the wall in the middle for more stability?
Did you use a 100% cotton fabric? Thanks.
I used a duck cotton fabric.
Great tutorial! I found yours from the pinterest. So I will try this at home with my husband. He will help me to do this 🙂 Anyway, I pinned yours in my pinterest. Thanks so much for sharing.
Joyce @ livelaughlovepost recently posted…Treat Yourself Giveaway Hop!
I would also love for a picture of how you nailed the valance into the window casing if you don’t mind. Thanks.
britt_zehr@hotmail.com
Brittany, I sent you an email, but please let me know if you have any further questions!
I too, would like to know how to mount it on to the wall
Check out the FAQ post for more detailed info. You can find it here: https://www.downhomeinspiration.com/faq-10-10-minute-window-valances/
Hi, love this idea. My concern is being able to see where fabric ends and all pins from outside the window? ?
Hi Shelley, I have blinds on all of my windows as well, so that has never been a concern for me. However, because I like to have as much natural light as possible in my home, I put the valance up as high as I can (while still covering the top of the blinds) so that it doesn’t cover much window. I think that if you were to hang the valance that way, you wouldn’t be able to see much from the outside. You could just leave more fabric along the bottom so that you could pin it up higher, if that makes sense.
A million thanks for sharing this. I have now made 8 of them for my home. I also have all my friends making them. So super easy! Your instructions are perfect!
Yay, I love to hear that Noncrafter!!!
I am dying to do this in my kitchen!!! Approximately how thick is the foam panel? The only thing I can find comes in 1″, 2″ or 3″ thickness. Thanks 🙂
Tif, the package that I used was 1/2″ thick.
Love love this tutorial! Picked up everything I needed today although I cannot find the panel foam for the life of me! I’ve even searched online and although I can find the exact brand you used, it is unavailable in my location and can’t be shipped. Very strange! I’m wondering, for an alternative foam board…what might you recommend? Excited to give this a try for our nursery! Making a matching crib skirt. 🙂
Hi Christie, what a fun idea for your nursery! I would have a hard time recommending another product since I have only used the one type of foam, but my suggestion would be to go to your home improvement store and show them the picture of the foam and ask for their recommendation on a similar product. I wish I knew more about other types of foam panels, but I am totally lacking in that department. 🙂 I hope that you find a substitute, and please let me know about it if you do.
I cannot find this type of foam anywhere either. Been to lowe’s and home depot. Showed them the photo. I am so excited to make these but now I’m stymied. How thick was the sheet you used?
If anyone finds a good source, please post!
Hello, can you provide more information on how you hung it to the wall?
Thanks so much! Great Blog!
So glad I found this tutorial! I just bought the foam at Lowe’s yesterday. It was about $9. The window I’m wanting to do this for is wider than the foam board, but I’m going to try the suggestion of duct tape and some kind of sticks for reinforcement. For anyone having trouble locating these at their local Lowe’s, if you go on their website to the product information page for the foam boards and select your local store using the zip code, it will tell you the aisle and bin numbers. Pretty awesome! I found these with no issues. I am going to use canvas drop cloth (from the paint aisle at Lowe’s), to cover mine.
Great tip Treasure! Thanks so much for sharing! Hope you love your valance as much as I do mine!
Did you find the exact foam in the photos? No luck at my lowe’s. 🙁
hi Kristen,
i am not at all crafty and this is my first diy project and i plan to do all my windows this way.
i have alot of 60-80 inch windows. so i will need to do the gluing two boards together and reinforcing with paint sticks.
my question, will i need to add an exta piece of foam behind the two pieces i attach together? like to glue it to wall or paint stick. to keep from sagging
thanks and i would appreciate any pics my email is sunchine062078@aol.com
Leah
How would you complete this project for a much larger window? I am concerned that my window is wider than the longest size you can get the foam sheets in. I appreciate your suggestions!
Have you ever added padding to the foam board first and then the fabric?
This was a Pinterest fail for me. Stayed with it for 3 hours, but could not make it work. The material was very flimsy to work with and when it came to the wobbly corners nearly impossible. Not sure what I did wrong, but very frustrating! Hopefully I can salvage the cloth and use a different material for the cornices in the future. So disappointed.
Oh Cynthia, I am so sorry to hear that! I have made them for multiple rooms in my home with no trouble whatsoever, so it really saddens me when I hear that it was a Pinterest fail. 🙁 Let me know if you have any questions or any specific concerns that I can help with.
What if your window isn’t trimmed out with wood? How do you hang them?
If your window isn’t trimmed out, I would suggest following the directions for the no-hole version. It should work well for you. You can find it here: https://www.downhomeinspiration.com/dig-window-valance-renter-friendly/
I can’t thank you enough!! My husband and I just moved into our house and there are 5 HUGE windows in the living room. We already have blinds up but I wasn’t sure how to decorate the windows without breaking our bank account. (curtains and rods were going to cost us upwards of $250!) This is the prettiest idea I’ve seen and I love it SO much more than curtains! Thank you thank you thank you!!
That is awesome, Summer! Congrats on your new house!
Today I went to Lowes and was directed easily to the foam panel package in the insulation area, went to Joann’s to get material(I got 3 yards of material that was 45in wide so I could cut down the middle and get 2 curtains per length) and indeed, after an hour, I had hung 3 amazing curtain panels-including a double where I used packing tape to connect two pieces of foam in the middle ( no other stabilizer needed). I did not make side corners but rather just made flat panels and hammered nails in the wall first then “pressed”‘the foam curtain onto the nail at each end-I could also then adjust for matching height, width and level.
I have been struggling for years to know what to do and my problem is now solved so easily-thank you!!!
If your Lowe’s and Home Depot don’t carry the panel foam (as neither of mine do), and you live in an area that has Menards stores, you may be in luck. Menards calls it “strip insulation”. The measurements are 3/4″ x 14.5″ x48″. You buy them individually for about $7.00. Hope this helps those, like myself, having a hard time finding the foam panels.
I just noticed the description online says it is a 6-pack (so maybe it’s not individual). I’m going to my Menards store tonight to check it out!
This looks like a great solution for our windows. While I hope our home improvement store will have the boards, if they don’t, what we’re the dimensions of your boards? Specifically how tall were the boards?
Mei, I cut all of mine to differing lengths, so I’m not sure how long they were originally.
Where was the foam panel located at Lowe’s? I can’t wait to do this project, but was having trouble finding the foam panel (even after showing them the picture)!!!
I did this in my living room last night!!!! It turned out beautifully!!!!! Such a cheap but classy way to dress up the windows!
Question on the foam… I can’t find it anywhere! Home Depot didn’t have it and I’ve tried looking online as well. Do you have any ideas what could be used instead? Thanks so much!
So happy I found your tutorial!! You have made a wanna be crafter feel like I can do this. I am heading out tomorrow to purchase my supplies, so excited…Thank you!!!
I cannot locate the panel foam anywhere!!!! Do you know where it can be found. I have looked all over and nobody carries it. Is there something else I could use??? I just love this idea
How do you hang it up I did not understand
Hi..i love this idea but my window is 97 inches wide..does the foam panel come in different sizes?
I’m going to try this over my ugly lightbulb strips in my bathrooms. (you know, those inexpensive metal strips w/ clear bare lightbulbs) I’ll use the Command strips to attach.
What a great idea, Oma! I’d love to hear how it works out for you!
hi! Did you create a top to your valence? Or could you see straight through to the ceiling if you were to look up into the valence from below?
Thanks!!
Hey Sarah, I did not create a top. You would have to stand right underneath the valance and look directly up, but yes, you could see through to the ceiling.
I just used your tutorial to make these for my bedroom. I just got a new comforter set and have an intense need for everything to match. I used my flat sheet since I don’t use one when making my bed so they match perfectly and I love them ever so much. Great idea and very easy to do. I am in love with them. Thanks so much! I will def be making them for the other rooms in my house.
I love this. What a great idea.
Thank you so much for this. I have wanted to make these for so long, but due to health issues, I had given up.
This just made my day.
You’re super crafty and appreciated.
Hi. I’m curious, what length did you make your valence from top to bottom? Looks to be about a foot?
Hey Leonie, I just used the full width of the panel so it is 13 1/4″ wide.
I love this tutorial. I’m making one to fit my 12′ sliding glass door. The insulation foam us going to help keep the heat out. However, I am not a crafty person and I’m doing over 144″ valance so it’s taking me much longer than one hour. I used foam caulk to join two pieces together then wrapped the seam with a/c insulating tape to get the length I need. I took a piece of cabinet trim, called scribe, and used foam caulk to adhere it to the foam side. I’ll let it cure overnight and see if I have to wrap more insulating tape around the wood pieces tomorrow.
I have the end pieces wrapped in fabric and I’ll do the long piece tomorrow. I have a double rod set up I’m covering so I’m going to make holes in the end pieces and stick the end of the curtain rods to the end pieces to secure it.
I live in AZ and the window I’m covering is West facing and it’s not very well insulated. This is going to do wonders to help trap the heat behind the curtains. I’ll send pics of the final project. Wish me luck, 12′ of window treatment is a tough DIY project for a novice.
That’s awesome, Stephanie! I am also a huge lover of the insulation factor…when it gets blazing hot outside, any little bit helps. Can’t wait to hear how it turns out!
Just a tip for hanging the valance or cornice: I’ve used heavy duty velcro to hang small curtain rodge. Just cut a small piece (1/2″ or less) and attach to wall or casing, attach matching piece to cornice. It works. Curtains have been up 3 years, and haven’t fallen yet! Easy for renters.
Awesome tip, Roxanne! Thanks so much for sharing!
HI, I was wondering if you pull the top and bottom together when pinning the fabric. Start from middle , pin top and bottom, then go to the right and then the left? Do you have a picture of you pinning? it would be so helpful. Thanks!! I am so excited to try this!!!
Hi Rachel, start in the middle and pull the fabric taut, inserting your pin at an angle to prevent it from poking through your fabric in the front. Next, pull the opposite side nice and tight in the middle and pin again. Working back and forth from one side to the other will help keep your fabric straight. Pin about every 2 inches or so.
Hi, I was wondering how to do the pinning of the fabric? Do you start in the middle and do top and bottom together. then go to the right, then the left?? Do you have a picture? I am really excited and want to do this right. Thanks!!!
What if you don’t have a window casing? I want to put one of these up in my kitchen… Do you think Command Hooks would be ok?
Thank so much for making this blog entry!
Audrey, Command Strips work perfectly! You can read how I did it myself here: https://www.downhomeinspiration.com/dig-window-valance-renter-friendly/
I have floor to ceiling windows in my dining form and living room. When I made my valances I had a difficult time having to cover the inside. Patterns were not matching up, bulky fabric in corners. Do you have any suggestions.
Hi Sue. I didn’t worry too much about covering the inside of my valance as unless you stand directly underneath and look up you can’t see it (and it’s nearly impossible to do that!). As far was patterns lining up, it’s just a matter of making sure that the first pins you put in are one in the middle on either side. That should help hold it tight and keep the pattern in the right place. You can continue pinning in that fashion, with one on each side to help. And corners can be tricky, but be sure to trim away an excess fabric and folding them in should be easier. Hope this helps, but please let me know if you need further help.
Some people have hadva hard time finding the foam.
Here ia a link to Lowe’s website that takes you to it. You can search to see if it’s in your local store or have it sent to your local store. The item number should also help store employees find it.
https://m.lowes.com/pd/Perma-R-Products-R2-9-Unfaced-Polystyrene-Foam-Board-Insulation-Common-0-75-in-x-1-13-ft-x-4-ft-Actual-0-75-in-x-1-13-ft-x-4-ft/3014185
how long ago did you do this? I priced panal foam at Lowe’s & they had nothing for the $10.-15. range.
https://www.lowes.com/pd/Perma-R-Products-Common-0-75-in-x-1-13-ft-x-4-ft-Actual-0-75-in-x-1-13-ft-x-4-ft-R2-9-Unfaced-Polystyrene-Garage-Door-Foam-Board-Insulation/3014185
$9.95 per board (size 4 feet long, 1 foot wide, .75 inches thick)
Loved this! Just made my first one for my laundry room and I’m hooked. GREAT directions – so easy to follow. Now on to the bedroom and 3 windows!
Awesome, Alex!!! So glad you loved it!
I like this project, but I made one with a friend today and it took waaaaaaaaaaay longer than 10 minutes. It took more like two hours with two of us working on it, and that doesn’t count shopping/prep time. Granted, we did have to splice two pieces of fabric together because the window is large, but even so, I would’ve guessed 20 minutes based on the 10 minute estimate here. DIYers, plan on this taking way longer (and costing way more) than what is listed
Sorry to hear that it took you awhile, Nikki. Hope that you are happy with the end result either way!
This. Is. Awesome.
Thank you… I now have 3 well-finished looking windows for under $50!!!
Window treatments have always frustrated me….. Pre-made ones are expensive, and then you are locked in to a bland, one-size-fits-all looking window. With this system, I can find the perfect fabrics and really made the windows and room look sharp. THANK YOU!
Oh, and I used foam boards from Joanne Fabric (36 in boards), which cost about $8.50 per board. The foam is 1″ thick, but all-white, so no gray dots to see.
Hey there!!! This was such a quick and easy diy! Thank you! Just thought I’d let you know, I used white drywall nails because they have small indentions on them that “grabbed” the foam better than the finishing nails. You should give it a try!
Enjoyed this post very much!
-Kirstiana
That’s a great idea, Kirstiana! Thanks so much for sharing!